

Showing posts with label SEO Help. Show all posts
Tuesday, 2 April 2013
Use Alt Attribute for Better SEO and to Increase Blogger Traffic


As all of you know about SEO (Search engine Optimization). If your blogger or site has better SEO then your page views or traffic will increase. Most of the people don't know that with the help of images, SEO could have been better. Now I'll tell you the way that how can you optimize your images and blogger traffic?
When a picture is downloaded from internet then it is saved with its by default name. Your first step is that you have to change its name with proper keyword or image description.
There is a great percentage of blogger traffic depends upon the image search. Google image search is used worldwide for original and quality images. So, when you put the image name
with keyword then it will come in image search and as well as in surfing with those keywords. Your blogger posts are also searching by your post titles and bold letters in posts will also help to search that post.
Now, follow these steps to use alt attribute properly.
Change Image Name with Proper keyword:
When you are downloading the pictures then these will be saved with their by default name. Change the names of images with proper keyword before uploading or inserting in blogger. For example if a picture is downloaded with name of 1, then you have to change it with your proper description according to the content before uploading.
Use Alt Attribute:
An image is useless and meaningless when it is not tagged with keywords. For robots search an image should be proper tagged. Because spider search and search robots can't read the multimedia without untagged images. So. proper tagged images will help the robots search to search a proper topic. For this purpose use alt attribute. After you upload the picture go to the 'HTML' portion which is along with Compose option. There you can see the by default code which is following:
<div class="separator" style="clear: both; text-align: center;">
<a href="https://blogger.googleusercontent.com/img/b/R29vZ2xl/AVvXsEgMHD_95MmUGRln6h_uNFH3cemSUaewNKO8S3OXmK_nLK2ryK6-DZbevbJ7RPVIIbivRpdnPbstnBBW8uHcvFBWBZ5Gn7kx7DR-ydvsn5g_dNYQU4YmpHX9qk7ACTtAYt9rtEof08LIKbhD/s1600/how+to+seo+optimize+blogger+posts+titles.jpg" imageanchor="1" style="clear: left; float: left; margin-bottom: 1em; margin-right: 1em;"><img border="0" height="265" src="https://blogger.googleusercontent.com/img/b/R29vZ2xl/AVvXsEgMHD_95MmUGRln6h_uNFH3cemSUaewNKO8S3OXmK_nLK2ryK6-DZbevbJ7RPVIIbivRpdnPbstnBBW8uHcvFBWBZ5Gn7kx7DR-ydvsn5g_dNYQU4YmpHX9qk7ACTtAYt9rtEof08LIKbhD/s200/use+alt+attribute+for+better+SEO.jpg" width="250" /></a></div>
Now, find the image code started with 'img' which is in purple color, just after this add the alt attribute and write your image description (proper keyword name of image) which is in red color like this:
<div class="separator" style="clear: both; text-align: center;">
<a href="https://blogger.googleusercontent.com/img/b/R29vZ2xl/AVvXsEgMHD_95MmUGRln6h_uNFH3cemSUaewNKO8S3OXmK_nLK2ryK6-DZbevbJ7RPVIIbivRpdnPbstnBBW8uHcvFBWBZ5Gn7kx7DR-ydvsn5g_dNYQU4YmpHX9qk7ACTtAYt9rtEof08LIKbhD/s1600/how+to+seo+optimize+blogger+posts+titles.jpg" imageanchor="1" style="clear: left; float: left; margin-bottom: 1em; margin-right: 1em;"><img alt="image description" border="0" height="104" src="https://blogger.googleusercontent.com/img/b/R29vZ2xl/AVvXsEgMHD_95MmUGRln6h_uNFH3cemSUaewNKO8S3OXmK_nLK2ryK6-DZbevbJ7RPVIIbivRpdnPbstnBBW8uHcvFBWBZ5Gn7kx7DR-ydvsn5g_dNYQU4YmpHX9qk7ACTtAYt9rtEof08LIKbhD/s200/use+alt+attribute+for +better+SEO.jpg" width="100" /></a></div>
Replace "image description" with your proper keyword name that was given by you after downloading according to the content. Try to use maximum 5 or less words.
Use this attribute and enjoy. This will definitely help you for better SEO and increase your blogger traffic.
Tuesday, 26 March 2013
How to Tweet Your New Post on Twitter Page Automatically

You know well about the importance of Social Media Networks. These are very important for a blogger or webmaster to improve his site traffic and viewers. So whenever you publish a new post then all of you obviously share it on social media to inform your fans and get traffic. To avoid from sharing manually, I have already discussed about the auto posting on facebook. Today, you will know that how your latest post will be tweet automatically on your twitter page. Before starting, you must have Feedburner Account of your blog/website. If you already have, then follow the instructions and your all new posts will ready to tweet automatically on your official twitter fan page.
Go to Feedburner and click on the feed account where you want to apply auto tweet.
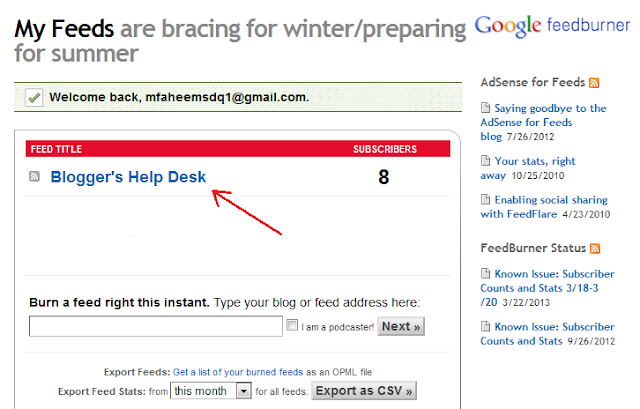
Now do the following procedure step by step:
1- Click on Publicize
2- Select Socialize from Left Sidebar Menu on Feedburner
3- Add your twitter account
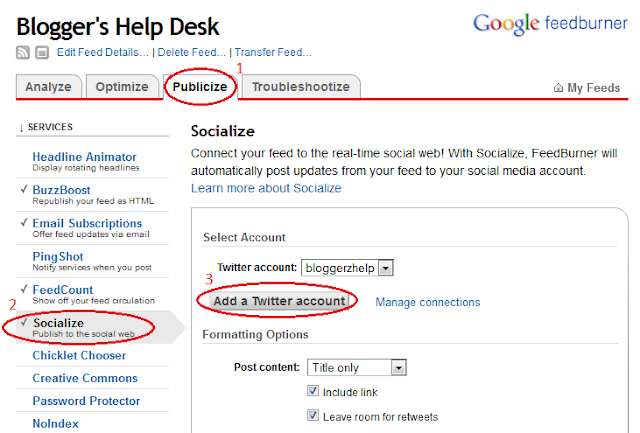
- You will be redirected to twitter login page, enter your twitter ID and password and then select "Authorize App".
- Now Keep all setting default on Feedburner page and "Activate" the facility.
- Save your settings and your all posts are ready to auto tweet.
Best Wishes!!
Thursday, 21 March 2013
How to Create Feedburner Account for Blogger and Wordpress

Feeds are considered the heart of a blog because this is the medium to promote your all latest posts. Whenever you publish a new post, it is fetched by your default feeds automatically and also publicize to all your readers and subscribers. The most popular and enhanced platform for your feeds is Feedburner. To access the feedburner, you have to create your feed burner account with the help of your default feeds' address.
Both Blogger and Wordpress platform provide default feed address for all bloggers. Using this feed address, you can easily create your feedburner account.
I have prepared a snapshot tutorial for you which will help to create your feedburner account.
Wordpress Feed Address
The default feed addresses for wordpress are:1- http://Yourdomain.com/feed/
2- http://Yourdomain.com/?feed=rss
From the above addresses, you can check your RSS feeds if you are using Wordpress platform.
Blogger Feed Address
If you are using Blogger platform then the default feed address is:e.g.
http://NAME.blogspot.com/feeds/posts/default
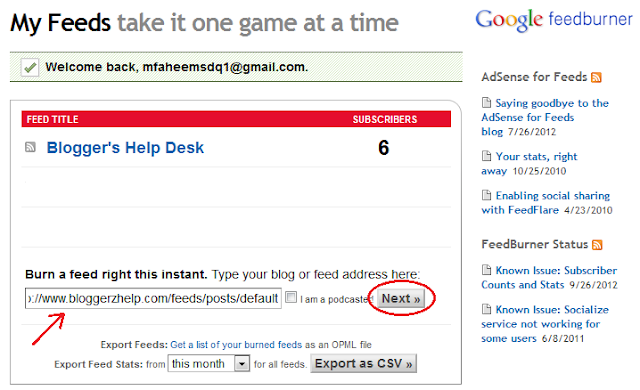
1- Now Sign In to your blogger/gmail account and go to Feedburner.
2- Enter your complete feed address as mentioned in the image and follow the process.
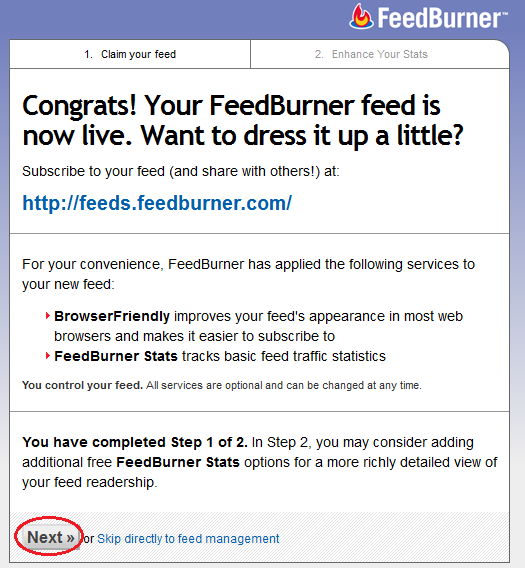
Feedburner will fetch your Feed Title and feed address automatically. You can choose the feedburner address of your choice e.g. http://feeds.feedburner.com/YOURSITE. It depends upon availability.
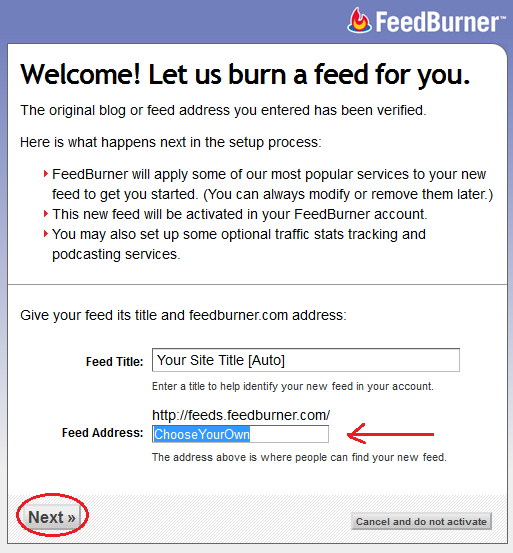
Next Step:
Now this is the Final Step:
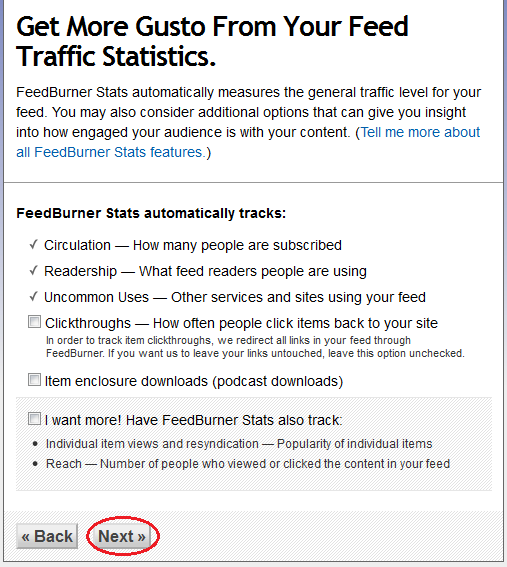
Your feedburner address and account is ready. Use this address for better SEO for your site.
Happy Blogging. Best Wishes!!!
Sunday, 17 March 2013
What is Difference Between Google Custom Search and Default Search of Blogger?
 Searching is very common now a days. Whenever a question for anything arises in the mind of any person, he always try to search this from search engines like Google, Yahoo, Bing, Ask etc. Similarly, a website can also have the search capability for the users to provide them specific posts which they are required. This search option filter only the site so we can say it limited search. There are two types of search for a blog. One is blog default search and the other is Google Custom Search. You can use both options for your site. This is another way to engage users within your site to enhance your pageviews.
There is a difference between both search options. I want to share this with you.
Default Blogger Search
The default blogger search option is provided with a lot of blogger templates or you can add this manually like your own customized search box. Whenever a user enter some keywords into this button, this search shows some posts having those keywords. These keywords maybe within the title or even into the post contents.
Disadvantage of This Search:
A very big disadvantage of blogger default search is that this is not intelligent. It means that if the user types wrong spelling or extra words then this search will show no results. And obviously 99% users have different mind and it is quite possible to mismatch the keywords from the posts content. This will cause to create bad effect on the user and he may leave your site and search again on the Google Search Engine. Then you know well the result of this.
Google Custom Search
Google provides custom search option for webmasters and bloggers to increase the intelligence of search from blog or a website. With the help of a code, provided by Google, you can add Google Custom Search Option on your blog or website.
Advantage of Google Custom Search:
The advantage of Google Custom Search is that it has the same intelligence as you find on the Google Search Engine. If you enter wrong spelling or less words then this search will surely provide the required posts. The difference between Google Custom Search and Google Search Engine is that custom search will bound to your website or blog only and will show the results only from your blog.
So Google Custom Search is best option for your blog to provide outstanding customer service.
Best Wishes!!!
Friday, 15 March 2013
Recover 404 Error and Redirect the Page to New Page in Blogger
 404 (Not Found) error is very common and it occurs because of a little mistake of webmasters or bloggers. In blogger platform, a lot of publishers are not familiar with this issue and that's why they failed to develop good reputation in Search Engine and lose a lot of traffic. When a search engine detects a link with 404 error, it decreases that link in the search directory. This error will also leave a bad effect on the visitor of that page. Today, I will tell you that how you can recover this issue and redirect your removed post's link to the new link or any other page.
Follow the instructions to escape the 404 error.
Open the link of your post which has an error of 404 and copy the part of link from first slash "/" till end (.html) as selected in the given snapshot.
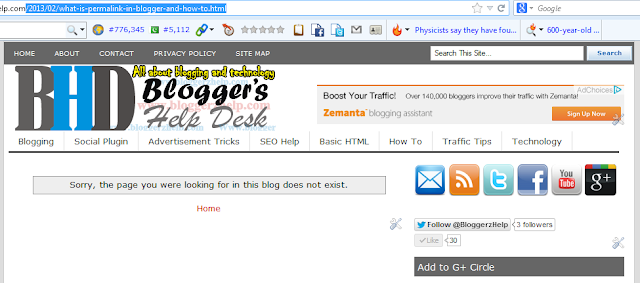
- Now go to your blogger dashboard > Settings > Search preferences.
- Edit "Custom Redirects" below the area of "Errors and redirections"

Now paste the broken link specific part into the empty space where it says "From" and the same part of the post link where you want to redirect that link in the rest of empty space. e.g. I want to redirect:
- From /2013/2/what-is-permalink-in-blogger-and-how-to.html
- To /2013/02/Permalink-and-its-use.html

When you will save, you can see the both of the links. Verify them and select "Save changes"
- Note: You have to paste only the part of links as you are looking in the selected area in image.
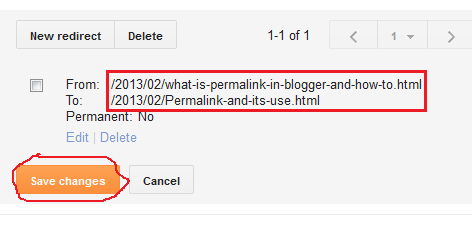
Now your broken link with 404 will automatically redirect to the new link instantly.
Hope you will like this. So share it with your friends.
Best Wishes!!!
What is 404 Not Found Error and How to Escape from it?

If a visitor clicks on your page link from Google Search Engine and the he/she looks "page not found" or "post not found" then Google will count this as Not Found (404) error. If you have your webmasters tools account then you can check the entry of this error there. This is also called crawl error. You will also see the broken link there. Broken link is the which which has an error of Page Not Found.
The page not found or post not found error occurs if you delete the post or page. Here, I have an example for you to consider the error and the entry of this in webmasters tools.

The given link has an error. You can also check the stats of this error e.g. from which time this error is occurring and when it was encountered last time.
There are some things which you have to keep in mind to escape from 404 :
- Never Delete Your Post or Page.
- Whenever you are updating or editing your post, do not select "Automatic" in Schedule and verify the URL from permalink that it is same as it was before.
- If a post or page is deleted, then redirect that post to the new post or another page or post.
- Whenever you want to change your permalink, then also remember to redirect the old URL to newer.
Disadvantages of 404
The disadvantage of 404 error is that your link will be removed from the Google Search Directory and will also cause of bad effect on the visitor.
Wednesday, 13 March 2013
Advantages/Disadvantages of Exporting and Importing a Blog in Blogger
 I have already discussed about the Exporting and Importing a blog. Today, I am going to tell you some advantages and disadvantages of Import/Export of blogger posts. Remember that when you export a blog then it means that you are exporting your all posts as well as comments of your blog and when you import that file to your blog, then all comments also publish along with related posts. Exporting is good and sensible decision to save your backup of blog but before importing it you have to remember that this function of blogger has some disadvantages. You can easily export and import your blog from here. The procedure is a bit different because of new blogger interface but no problem, you can check the following snapshot.
You can easily export your blog from here to save the backup.
Exporting a blog has some advantages but importing of a blog will obviously cause for a great loss.
Advantages of Exporting a Blog
You can export your blog to save your all posts and data within your post. The very benefit of this is that if you lose your posts then you do not need to write again. You can import your blog and all posts and comments will be published again with the same title and in such a way, you will save your work and time.
Another advantage of exporting a blog is that you can also transfer these posts to another blog or wordpress blog if you are going to use wordpress platform.
Disadvantages of Importing a Blog
Importing of blog is useful only if you are importing it to a newly created blog but if you are importing it to your older blog (from which you have exported it) then it is never sensible. There are some important points in the form of disadvantages:
Your old URL will be changed:
When you will try to restore your blog by importing then you will never get the old URL of your posts. Blogger will publish your blog with new URL. Although there will a minor change in URL (e.g. www.bloggerzhelp.com/2013/3/oldURL.html will publish as www.bloggerzhelp.com/2013/3/oldURL_342.html) and this will cause 404 (Not Found) error to your old post if it is deleted. Because of this you will lose your all traffic as well as Search Engine Indexed Pages. Because when Google see that the post is not found, that URL will be removed.
You will never get your old position in Google Search Results:
Because of new URL, your post views count will start from zero, so because of down reputation, you will not get better position in Google Search and it will take a lot of time to recover. It is like that you are at the position when you have started your blog.
So be careful to import your blog and never delete your old posts.
I hope it will be proved helpful for you. Best Wishes!!!
Saturday, 2 March 2013
What is Robots.txt File and How to Edit This?

Robots.txt file is very important for a blog or website for best SEO. This file consists of some instructions for search engines. Each search engine uses its own automatic process to scan the internet which is called "robots". The name of famous robots are crawlers, spiders and wanderers. A good robot always follow the instructions within the file robots.txt. This file is located in the main directory of each site e.g. our site robot.txt file is located in the http://www.bloggerzhelp.com/robots.txt. Similarly, each website has its own robots.txt file within /robots.txt. If a website do not have this file then search engine will ignore that site always or in case this file is configured incorrectly. So to better SEO check the existence of this file and verify the configuration of this.
Before fetching any instruction from your site, robot always read the instructions from this file and follow that which path is allowed and disallowed for it. If there is no robots.txt file, then it is considered by robot that the web owner does not want to provide any specific instructions and leave that site.
- All blogger blogs have this file by default and you can see that the "Custom robots.txt" option is disabled by default. Remember that, for better search engine optimization, always keep disable custom robots.txt file as Blogger is providing you the best robots.txt file. You can check this from Settings>Search Preferences under the field of "Crawlers and Indexing".
For those who has self hosted website must create this file and upload it in the "/" directory. There are some instruction for editing this file.
Open notepad and write this:
# robots.txt for http://www.example.com
User-agent: Mediapartners-Google
Disallow:

User-agent: *
Disallow: /search
Allow: /

Sitemap: [your sitemap URL Here]
Replace your domain name instead of example and paste the URL for your sitemap instead of
[your sitemap URL Here]
Now there are some extra tips to create a better robots.txt file:
If you want to allow all robots to visit all files then use this:
User-agent: *
Disallow:
If you want all robots to stay out of your site then use this: (This is not good)
User-agent: *
Disallow: /
If you want all robots to restrict from specific directories then use this:
User-agent: *
Disallow: /directory1/
Disallow: /foldername/
Disallow: /tmp/
If you want a specif robot not to enter your site then:
User-agent: BadBot (replace 'BadBot' with the actual user-agent of the bot)
Disallow: /
Now update your robots.txt file for better Search Engine Optimization.
Best Wishes!
Saturday, 23 February 2013
How to Write The Best Optimized Post Titles for Blogger
 Traffic from Search Engines is very important for a blog because the mostly traffic, a blog gets, has a source as search engines like Google, Bing and Yahoo. All search engines filter the blog from the title of posts. We can say that about 90% traffic from search engines depend on the contents of a post title. Although the post contents are also valuable but they have second priority. So if your post title is well optimized then your post will get high rank in Google Search Engine Directory and obviously your blog will also get higher Alexa traffic rank because of such optimized posts.
It is very important to make keen attention while writing your post title. There are some key points to optimize your blog post title and enable it to get attraction from the searchers.
Never Increase The Length of Title Characters Than 65
Remember that if your blog post title has more than 65 characters then Google will chop the rest of title. If you will keep the title under 65 characters then it will become more considerable and attractive for searcher. Also remember that spaces between words will count as character. Lets see this example from search engine results:

In the above snapshot you can see the post title ending with (...). In this title, Google has chopped the rest of characters.

You can see the above post with complete title without chopping.
Use Google Search Suggestion for Best Post Title
You can also use the Google Search suggestion for your best post title. Just go to Google page and type words from your desired post title. Google will suggest you with some sentences. These are the mostly searched sentences regarding to that words. And whenever a searcher write some keywords then he also prefer to select the Google suggested keywords.
So this will be best post title for you.

Best Wishes!!!
Tuesday, 19 February 2013
Protect Your Blog from Google Panda Update Hit

All of you surely know about the Panda and Penguin Updates. The first Google Panda Update release hits the 12% of sites and causes to take them down in the search engine index. The reason was obviously the blog or site's quality. From that time, high quality sites are getting up in rank and in the directory of search engine. After Google Panda updates many bloggers become more careful about their blog SEO and quality assurance. They also have started to concentrate upon the quality not quantity. Google always demands the high quality as well as some quantity. The sites with thin contents was also hit by Google Panda updates. Google quality does not mean that you have used good English. It means that what you are writing is fruitful for the audience and also matches with the title of the post. Lets have a look on the points from which you can escape from hit by Google Panda Update.
What Kind of sites are Hit by Google Panda
Before starting it we must know that which kind of websites or blogs are hit by Google Panda Update. Google Panda Update usually hits the following sites:
- Slow Load Time: All websites those take time to load become the victim of Google Panda Update.
- Copyrighted Material: Site with duplicate contents are not encouraged by Google too.
- Low Quality Contents: All sites with low quality and thin contents get hit by the panda.
- Sites with lot of Ads: Google does not like the sites or blogs having a lot of ads units or networks. Although it is important for blogger to put some ads units but putting a lot of ads units is not better choice. This will not only get down your site but also take users away from your sites through the ads. Remember that with less ads units you will earn same as with a lot of ads units.
- Huge Size without Quality: If you have contents in high quantity, then you will get badly hit by Google if there is just quantity but no quality. So make reasonable size of your post with good quality.
- Black-Hat SEO: Over optimization is bad thing for site reputation as well as also disliked by Google Panda Update. For an example, before this update, when you had searched for "example" then a site having just word of example get the top number in search engine and there you had found nothing. This was bad thing but such sites are now "treated well" by Google.
Get Rid of Extra Ads Units
To escape from hit by google panda update, remove all extra ad units from your site. Usually three ads units are enough and good for site. For better optimization, put some gap between ads units and try to cover all page with three ad units e.g. top, middle and bottom of your page. Remember that never put more than 1 ad unit within contents.
Write Quality Contents for Your Blog/Site
To write quality contents, your grammar must be better. You can use any writer program such as Microsoft Word or any other having spelling and grammar checking capability. Insert some images to make your post more considerable and easy where it is needed. Start your post with a well define introduction about the topic and the post length should be round about 500 or more words. Never forget to make some internal links within your contents.
Remove Low Quality Contents
Remove all low and poor quality contents from your blog. You can search and read it from your old posts. Usually you will find them in your posts that you have written at the start of your site. Either update them into quality content or remove them because Google punish the site with domain-level and a single bad or low quality link will effect your overall site.
Get Rid of Duplicate Contents
You obviously hate copying if you are a good person and Google also hates this. So try to escape from duplicating contents. Google can not understand the original and copied contents, so in case someone has copied your content then both you and the thief will be targeted by Google. You can find if anyone copying your content easily. Just copy a paragraph or 3-4 lines of your contents and put then within inverted comas (" ") and hit search. You can see the results. Then file a copy against all of them using Google DMCA Link.
Avoid Keyword Stuffing
Keyword Stuffing means "using excessive keywords". Google does not like keyword stuffing so whenever Google discovers a high density it checks and considers this as spamming. So avoid this as this is also known as black-hat SEO.
Get Some Knowledge About SEO
Search Engine Optimization is very important to increase the traffic and for the success of a blog. So you must have some know-how about the SEO such as meta title, description and keywords, webmaster tools, sitemap submission, image optimization etc.
Back-linksGuidance
Try to get some quality back-links as they are very important to increase the traffic and rank of your blog or website. Back-links normally generate automatically. Never try to purchase back-links because they are low quality and not genuine so cause to down your site. You can also get back-links by writing guest posts etc.
That's all about escaping from Google Panda Update so be careful and update your site or blog accordingly.
Best Wishes!!!
Friday, 15 February 2013
Is Parked Domain is Sensible Choice Before Launching a Site?
 All domain's host have the feature of parking a domain. Park a domain means that someone leave his/her custom domain for the burst of ads with having zero contents. You can think that is it better for you or not?.
Before launching the Google Panda and Penguin Updates, parked domains getting very traffic from search engine and causing trouble for the internet users.
These type of domains have no content instead they are decorated with a lot of ads. These are usually Google ads and when a user click on any link, he get nothing but the parked domain owner succeeds in his aim.
There are many points at which parked domain are generating in a lot of numbers day by day.
How a Domain Become as Parked?
Whenever you purchase a domain from any host (e.g GoDaddy.com) they offer you to park your domain for minor yearly charges. This is the case when you have bought a domain before launching your website (Mostly people purchase a domain name before launching a site for future reservation). So the people who do not know about the "Advantages" of parked domain, become the victim of this "feature". They think that instead of remaining free, it is better to earn some money from that domain. But they are killing the future of that domain. Because now Google is discouraging such sites by removing them from search engine list. And if, by chance a user gets access to that site, he may make a click on the ads (obviously), but when he finds nothing then that domain name will earn a negative point and that user will never come back to that domain directly or through search engine.
The other way if you do not park your domain then your host will make it "Parked Domain" without your permission if you leave it useless.
How to Get Rid of Domain as Parked?
So if you purchase a domain, then also purchase web hosting and set a home page with some text or image to guide user about a bit future of that domain. This will cause to leave a good effect on the user and he may visit your site in future.
To secure the future of your site, parked domains are not good choice for you. So escape your domain from parking and leave a good effect on the user before launching that site.
Sunday, 6 January 2013
What Are Google Panda and Penguin Updates?
Google Panda was released in February 2011 first time. It is basically a change in Google Search Results Ranking of all websites. This algorithm has changed the search result rank according to low-quality and high-quality sites. According to experts, there was some increase in rank of social networking sites and news sites and decrease in the sites which has large number of Ads, in result of this algorithm. The first Google Panda updates effect the 12 % of all search results. Google Panda established to protect the copyright of publisher as many scrapers have taken place in the cyber world who copy the data from different websites and publish it to their blog/site with their name and were eating the rights of the real publishers and getting batter search results. When Google Panda roll-out first time, many websites including Google Webmaster Forum has filled with complains against the scrapers that they are getting better rank as compared to the sites with original contents. So Google Panda updates time to time and the globally affect was achieved in April 2011. By the way of help to affected publishers, Google has provided an advisory on its blog where it has provided some help for self-evaluation of website's quality. Google has listed round about 23 points answering the question of "What counts as a high-quality site?". This may will provide some help for webmasters.

How Google Panda Works?
Google Panda was created with the help of algorithm updates. This algorithm uses artificial intelligence in more scalable and better way than that of all before. Before it, the human quality persons ranked and rated thousands of websites according to speed, design, trustworthiness and internal links. Then the new Google Panda machine-based algorithm was used to check the quality on the basis of similarities of websites which was founded by people on the base of high quality and low quality. On the result of Google Panda algorithm, many new ranking factors have been created, because of it the older ranking factors like PageRank have been decreased in importance. Google Panda Algorithm is run by Google on regular basis.
Last Google Panda 3.92 updated on September 18, 2012 and it effected about 0.7% of all queries.
What is Google Penguin Updates
Google Penguin Algorithm was first released on April 24, 2012. The aim of this algorithm was also to decrease the site in search raking those use clocking, participate in link schemes, use keyword stuffing and create duplicate content as well as violate the Google Webmaster's Guideline.
According to google, this algorithm effected about 3.13% search queries in English and about 3% in language like Chines, Arabic and German and very large percentage in the language considered as "Highly-Spammed Languages". Google Penguin 1.1 updates was announced on May 25, 2012. This updates effected less than 0.1% of English search queries. The principle of this update was to penalize the website that use underhand technique to get high rank. Google Penguin 3 was announced on October 5, 2012 and affected 0.3% queries.
I hope this will be very helpful to you. If liked then please share. Carry on real blogging. Good Luck
Thursday, 22 November 2012
Submit You Site to All Social Bookmarking Sites with Single Click
Site rank is very important to the publishers, so they always want to get huge traffic towards their website to improve their world rank. The very large mean of traffic is social media and bookmarking sites. Today we know about a lot of Social Websites from which we can get traffic to our blogs/websites. It is very difficult to submit your sites to hundreds of social networks one by one. So I am going to tel you the way from which you can submit your site to all social bookmarking sites instantly with just a single click.

How is This Possible?
The method is very simple. Just go to Socialposter.com and fill out your URL, Title of your website, some description text and Tags of your website and Click Generate. Remember one thing that you must have account for the Social Network and also you must login to the network before you submit. So the ease is that you do not need to entering the information like URL, Title etc every time but just one time for all social media networks.
Tuesday, 7 August 2012
How to Show Profile Picture with Google Search Results

Most of the traffic comes to your blog through search engine such as Google. If we type some keywords in the Google search then it shows a lot of websites in a results. Here we can see that some has the author pictures while some don't have.
So if you want to show your profile picture with search result related to your site then follow the precess.
1- If your blog is older and you still not connect your Google + profile to your blog then first connect it using the following pointed option in blogger.

2- Add your Google + Profile Link on your blog's side bar using the following code.
<a href="Your G+ Profile URL"
rel="author" target="_blank">Join me on Google+</a>
Note: rel="author" will tell robots that you are the real Author of this page.
- Replace Your G+ Profile URL with your own Google + Profile link. For example my Google + Profile URL is https://plus.google.com/107002605838587470279
- Join me on Google+ is the display name of the link on the blog page.
Example: Following is the link on my Blog

3- If you did not create About Me Page then create it and remember that add your profile picture with 128x128 px dimensions with JPEG Format. Also add the link of your Google + Profile as internal link on your Name on the About Me page discription using the following code.
<a rel="me" href=Your Google+ URL title="Your Name">Your Google+ Name</a>

4- Add the link of About Me page on your Blog.
- The most usual place is the Footer of your blog page. Use the Following code to add link.
<a href='http://www.bloggerzhelp.com/p/about.html' rel='author'>About</a>
- Use Your Own About Me page link instead of http://www.bloggerzhelp.com/p/about.html

5- Now Go to Your Google + Page and Click on Edit Profile.
6- Add your Blog URL to Contribute to option and then also add your blog URL and About Me Page URL to Links option in the editor.

- Now You can Check you implementation from Rich Snippets Testing Tools by Entering Your Blog URL and then match the result with the following:

If you have seen the result with Verified: Authorship markup is verified for this page. Then you are done.
Now be patient and wait for upto 3 days for the result in Google Search Engine. :-)
Thursday, 2 August 2012
Link Your Blog/Site to Google Analytics

Google has started a free service for webmasters. Which is about the statistics of the visitors to their sites and is known as Google Analytics. Google Analytics also provide the premium service for a Fee.
In Google Analytics free service, you can check about your daily visitors, unique visitors, total page views. Further more you can also check that how much visitors are from which country.
Another service that is provided by the Google Analytics is Real Time Statistics. You can check that how many users are visiting your website/blog right now.
You can easily link your page to your blog/website. Simply Sign Up for Google Analytics.
When you have completed the sign up process, then you have been provided a Tracking Code. Copy that code and paste it into your Sidebar Gadget using HTML/JavaScript.

After putting that code, your blog will be linked to Google Analytics.
You can check real time statics from your Google Analytics Account.
Firstly, open your blog/site page. (so that at least one real time visitor may be online)
Then Go to Home Tab and select Real Time Beta and click on Overview of Location to check your real time visitors.
More services that are provided by the Google Analytics are the statistics of your Adsense account e.g. click count and also your AdWords account.
Tuesday, 31 July 2012
What is Bounce Rate, and It should be Higher or Lower?

Bounce Rate is the percentage of those visitors who visit your site and go back without visiting any other page or navigate your site. For example, a visitor come to your blog from search engine and then he leave your blog just visiting that page and never visit any other page/post of your blog. If your blog has a lot of such type visitors then it causes to increase in Bounce Rate, which is poison for your blog, blog rank and traffic.
Bounce Rate must lower to increase the rank and visibility to search engine.
How to decrease Bounce Rate?
You can decrease you bounce rate by:
1- Adding internal links within your posts content.
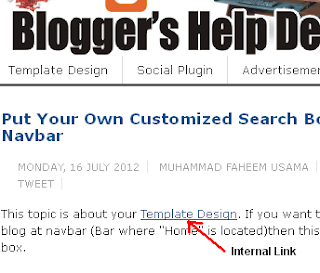
2- Design the layout which attract the visitors and insist him to navigate within your site.
3- Keep the widgets which cause to busy the visitors within your site.
4- Put the Ads of your Own posts links, so that if users may click on them, they will remain on your site.
5- Be attentive while putting ads on your site. Remember that ads will take your visitors out.
Which factors cause the increase in Bounce Rate?
1- All types of ads take the users away from your site. It is fact that ads cause to generate revenue for the blogger but these are also big reasons to increase the Bounce Rate :-)
2- Slow page loading speed, user can leave the page by closing it or by pressing "Back" button on the browser.
Saturday, 21 July 2012
How to Add Sitemap in Webmasters Tools
Sitemap is your blog's all posting list. We can say it the RSS Feeds. The submission of sitemap to Google Webmasters Tools is necessary because it tells the Google about the latest post of your blog. If you do not submit your sitemap to Google Webmasters Tools then the Google will not discover your posts and it is very possible that your blog will never filter by the Google Search.
Now do the following steps to add Sitemap to Google Webmasters Tools:

1- Go to Google Webmaster Tools
2- Click on your Blog URL (e.g. yourblog.blogspot.com)
3- Now select Optimization from left sidebar.

4- Click on Sitemaps, then click ADD/TEST SITEMAP,
write
feeds/posts/default (for blogger)feed/ (for wordpress)
and
Submit Sitemap.

Thursday, 19 July 2012
Prepare Your Blog For SEO (Search Engine Optimization)
Every Blogger wants that his/her Blog must be visible in search engine when anyone searches the content relative to his/her blog and it will be possible when your blog is prepared for SEO. There are many basic things which are necessary for the bloggers to do when they have created a new blog. When you get your blog URL or your own Domain, do the following procedures:
1- First of all Submit your URL to Google (Add your URL to Google Search Engine Directory)
2- Also add your first all Post's URL to Google.

Believe me your site will filter by Google search engine as soon as possible even you will be surprised to see your site on Google Search very soon. You can verify by typing your Blog or Website URL e.g. www.bloggerzhelp.com after 4 hours and you can see your site/blog and all posts with title which you have submitted to Google on the Google Index page. It will show on the Google even if your site/blog age is not more than 1 week. Try this and pray for me.
Subscribe to:
Posts
(
Atom
)


