

Showing posts with label How To. Show all posts
Thursday, 11 April 2013
How to Apply Read More Option to All Posts Automatically in Blogger


You have noticed that almost every blog has Read More button on the posts which are displaying on home page. These posts have excerpt function to make the posts short on the home page for wider coverage of posts.
In blogger, there is no excerpt function for posts by default. That's why, a simple blogger template always displays full post. Because of full length post on home page, the length of the page has been increased or the home page covers only 2 or 3 posts maximum. Some custom blogger templates has the excerpt function for the posts.
If you will apply this function then home page can cover more posts with equal size and space. Another benefit of this function is that it causes to increase the charm and beauty of your blog layout.
If you are using a template which does not have the read more function, then you can easily apply this function for your current template. Simply follow the steps:
1- Go to blogger dashboard and choose "Template" and then click on "Edit HTML"
2- Press "Ctrl+F" and use Template Editor search area for searching </head> and press Enter
(Note: Click on the template code area and then press "Ctrl+F")

Now Just above the </head> tag, paste the following code.
<script type='text/javascript'>
summary_noimg = 250;
summary_img = 200;
img_thumb_height = 150;
img_thumb_width = 150;
</script>
<script type='text/javascript'>
//<![CDATA[
function removeHtmlTag(strx,chop){
if(strx.indexOf("<")!=-1)
{
var s = strx.split("<");
for(var i=0;i<s.length;i++){
if(s[i].indexOf(">")!=-1){
s[i] = s[i].substring(s[i].indexOf(">")+1,s[i].length);
}
}
strx = s.join("");
}
chop = (chop < strx.length-1) ? chop : strx.length-2;
while(strx.charAt(chop-1)!=' ' && strx.indexOf(' ',chop)!=-1) chop++;
strx = strx.substring(0,chop-1);
return strx+'...';
}
function createSummaryAndThumb(pID){
var div = document.getElementById(pID);
var imgtag = "";
var img = div.getElementsByTagName("img");
var summ = summary_noimg;
if(img.length>=1) {
imgtag = '<span style="float:left; padding:0px 10px 5px 0px;"><img src="'+img[0].src+'" width="'+img_thumb_width+'px" height="'+img_thumb_height+'px"/></span>';
summ = summary_img;
}
var summary = imgtag + '<div>' + removeHtmlTag(div.innerHTML,summ) + '</div>';
div.innerHTML = summary;
}
//]]>
</script>
Now Search for <data:post.body/> and replace it with the following code:
<b:if cond='data:blog.pageType != "static_page"'>
<b:if cond='data:blog.pageType != "item"'>
<div expr:id='"summary" + data:post.id'><data:post.body/></div>
<script type='text/javascript'>createSummaryAndThumb("summary<data:post.id/>");</script>
</b:if>
</b:if>
<b:if cond='data:blog.pageType == "item"'><data:post.body/></b:if>
<b:if cond='data:blog.pageType == "static_page"'><data:post.body/></b:if>
<b:if cond='data:blog.pageType != "static_page"'>
<b:if cond='data:blog.pageType != "item"'>
<div style='float:right;margin-right:10px;margin-top:5px;'>
<a expr:href='data:post.url'>Read More</a>
</div>
</b:if>
</b:if>
Now "Save template" and check the work.
Important Notes:
You can change the thumbnail size and number of character before Read More option of your choice.
summary_noimg = Increase the characters if your post have no image.
summary_img = These characters are apply on posts with images
img_thumb_height = This will apply for the height of your post thumbnail on home page
img_thumb_width = This option will work for the width of your post's image on home page.
Wednesday, 10 April 2013
How to Work With New Blogger Template HTML Editor

Blogger has recently changed the HTML editor. Now if you open your Template setting and click on the Edit HTML, you will find a completely changed layout. Blogger HTML Editor has been changed having some new extra features and functions. This new editor reduces the blogger's over work and problems which some of bloggers have been facing in old editor.
This new editor has the functions like Jump to Widget, Preview template, Revert changes, Revert widget templates to default and format template. Lets discuss all of them briefly so that you can work easily and without hesitation with this new editor.
Jump to Widget:
This function will take you to the selected widget area within the template code. This function will show your all widgets which are currently using within your template.
Preview Template:
You can preview your template after applying some new features or changing. The preview will appear on the same page instead of html code.
Revert changes:
You can easily revert the change which you have applied to your template. Remember that do not save your template. Use preview template function to check the apply changes. If you save the template, you can not revert.
Format Template:
This function will arrange your template code in proper way and clean up the indentation of the template. You must apply this instantly without hesitation.
Benefit of the new Editor over older one:
Following are the benefit/function which are useful in new editor:
Line Numbering:
This will helpful to go to the line which have some error.
No Need to Expand Widget Template:
Unlike older editor, there is no need to expand the widget template, so this function has been obsolete.
Save Change Affection:
In older editor, if you applied save change, then the editor took you to the top of the editor. But in new editor, you will stay at the save line in the editor where you were before the saving.
Tuesday, 2 April 2013
How to Transfer Blog from Blogger to Wordpress without Changing Posts Links

Worpress users are increasing day by day because of its easy and user friendly interface. Another reason is that, it is providing platform for those who have hosting account and want to run their blog as self hosted blog. If you are running your blog on blogger and want to transfer it to the wordpress with self hosting, then it is very easy. You must have your top level domain to transfer it because usual blogs always given the sub-domain of the respective blog like example.blogspot.com and example.wordpress.com. To keep the same url on wordpress, your blog on blogger must have top level domain.
Lets explain with example. If you do not have your own domain then your post link will be:
Lets explain with example. If you do not have your own domain then your post link will be:
http://example.blogspot.com/2013/04/post-title-words.html
In case, you transfer your blog to wordpress then the link will be:
http://example.wordpress.com/2013/04/post-title-words/
Now there are two problems with the links:
1- Top Level domains are different, which will cause as change of link (blogspot.com and wordpress.com)
2- Blogger link has .html extension while wordpress does not have any extension by default
The second problem can be solved if you are using your own top level domain.
So to start shifting your blog from blogger to wordpress, firstly export your blog from blogger settings.
After completion of export, do the following procedure.
1- Set your permalink in wordpress settings:
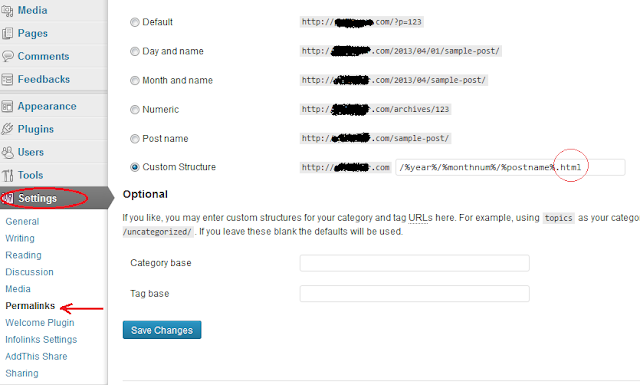
2- Select "Permalinks" under the Settings area and then choose "Custom Structure"
3- Add the extension .html in the end of the default custom structure link as mentioned in the snapshot.
4- Click on "Save Changes"
Now its time to import your blog here. All posts will be automatically published with the same links as on blogger.
Go to Tools and select Import option
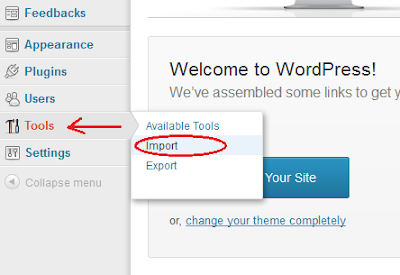
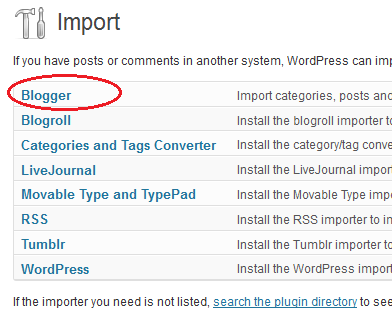
Now click on the Blogger which is at position 1st
Install the blogger importer plugin which will appear after clicking on Blogger
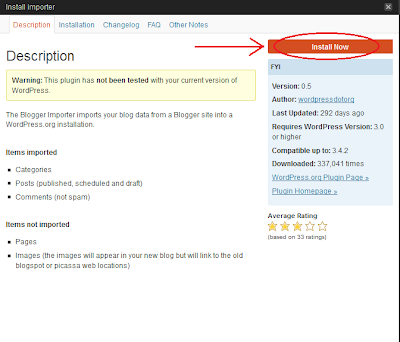
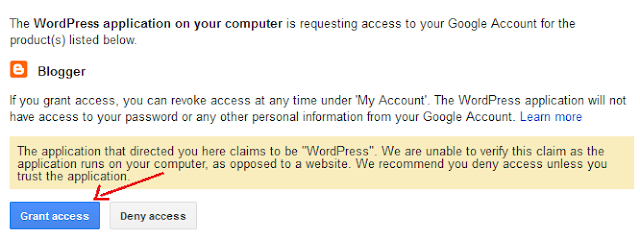
After installing successfully, click on the authorize button you will be directed to blogger

Now you will see your blog title, url, and number of posts and comments on wordpress page, click on "Import" Button
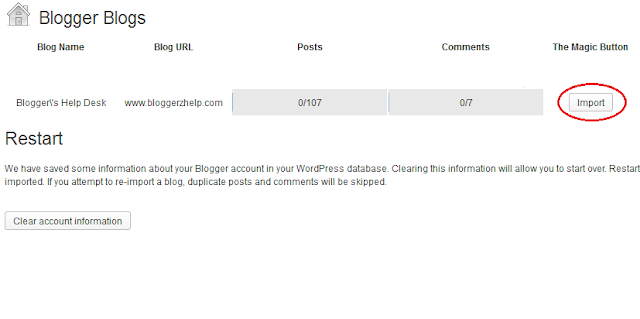
Your complete blog now has shifted to self hosted wordpress blog with old posts' links and comments.
Must Remember
1- Do not forget to submit your new site map to the webmaster tools and also update your own new feed url (example.com/feed/) into your feedburner account.
2- Go to your domain control panel and change your CNAME (Alias) setting and point www to @
2- Go to your domain control panel and change your CNAME (Alias) setting and point www to @
Friday, 29 March 2013
How to Change Default Post Time for Your Blog

There are many bloggers from all over the word. Some are professional blogger while some are amateur. These all bloggers are from different countries. Whenever a blogger publishes his post, the default time of publishing is assigned to the post according to the time zone of the blog. Blogger has set default time zone for all regions which is Pacific Time. To better management of your blog, you should change the time zone according to your location.
Changing the time zone is very simple and easy. When you will change the time zone of your blog, this will automatically apply to all your posts and the publish time of your all posts will set according to your current time zone.
To change your blog time zone, follow the steps:
1- Go to Blogger Dashboard
2- Select Settings > Language and formatting
3- Under the "Formatting" are, select your time zone accordingly
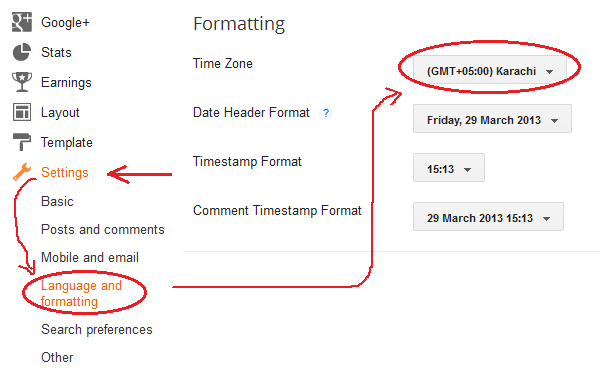
4- Now save your settings, your all posts' time will be set as your current time zone.
How to Add Email Subscription Box in Blogger

This tip can help you to increase your number of regular users and also increase the number of page views. When you put useful things and information in your blog then many people want to join your site to get the daily update news and information from your blog. For this purpose you have to add the email subscription form or box into your blog so that they can easily get the updates of your blog.
Here is the procedure that how can you add this box into your own blog. For this purpose, follow these steps:
- First of all go to your blogger 'Dashboard'.
- Then go to 'Layout' and click on 'Add a Gadegt' option.
- You'll have a pop-up window, from this window find and click on 'HTML/JavaScript' option.
- Then you'll have an empty box. Don't write anything in 'title' option just under the title option write the following code:
<style>
.hl-email{
background:url(https://blogger.googleusercontent.com/img/b/R29vZ2xl/AVvXsEi4KVTA4Wh9M_sLfLJYynbjIFf6k1nbputAp8c09yGkx63L58uyEXLsaRRdFdFaYZALMik4A1wjGMz6ukI8IsQW2sXFuwouXcjq70gDsnSdGyzil2GX8TDAGK1JtLRryxrJ2S-GOv9EemM/s1600/mail.png) no-repeat 0px 12px ;
width:300px;
padding:10px 0 0 55px;
float:left;
font-size:1.4em;
font-weight:bold;
margin:0 0 10px 0;
color:#686B6C;
}
.hl-emailsubmit{
background:#9B9895;
cursor:pointer;
color:#fff;
border:none;
padding:3px;
text-shadow:0 -1px 1px rgba(0,0,0,0.25);
-moz-border-radius:6px;
-webkit-border-radius:6px;
border-radius:6px;
font:12px sans-serif;
}
.hl-emailsubmit:hover{
background:#E98313;
}
.textarea{
padding:2px;
margin:6px 2px 6px 2px;
background:#f9f9f9;
border:1px solid #ccc;
resize:none;
box-shadow:inset 1px 1px 1px rgba(0,0,0,0.1);
-moz-box-shadow:inset 1px 1px 1px rgba(0,0,0,0.1);
-webkit-box-shadow:inset 1px 1px 1px rgba(0,0,0,0.1); font-size:13px;
width:150px;
color:#666;}
</style>
<div class="hl-email">
Subscribe via Email <form action="http://feedburner.google.com/fb/a/mailverify" id="feedform" method="post" target="popupwindow" onsubmit="window.open('http://feedburner.google.com/fb/a/mailverify?uri=bloggerzhelp', 'popupwindow', 'scrollbars=yes,width=550,height=520');return true">
<input gtbfieldid="3" class="textarea" name="email" onblur="if (this.value == "") {this.value = "Enter email address here";}" onfocus="if (this.value == "Enter email address here") {this.value = "";}" value="Enter email address here" type="text" />
<input type="hidden" value="bhd" name="uri"/><input type="hidden" name="loc" value="en_US"/>
<input class="hl-emailsubmit" value="Submit" type="submit" />
</form>
</div>
Customization:
- Replace the URL for your desired email icon in Pink colour portion.
- Adjust the value of text area according to your own in 150 place.
- Set your own Feedburner email feed link in place of Red portion.
- Replace 'bhd' with your feed title. You ca get it at the end of your feed link.
Now you are done, save your widget and set it on your page layout and then click on 'Save arrangements'. Check your blog and enjoy with this feature.
Tuesday, 26 March 2013
How to Tweet Your New Post on Twitter Page Automatically

You know well about the importance of Social Media Networks. These are very important for a blogger or webmaster to improve his site traffic and viewers. So whenever you publish a new post then all of you obviously share it on social media to inform your fans and get traffic. To avoid from sharing manually, I have already discussed about the auto posting on facebook. Today, you will know that how your latest post will be tweet automatically on your twitter page. Before starting, you must have Feedburner Account of your blog/website. If you already have, then follow the instructions and your all new posts will ready to tweet automatically on your official twitter fan page.
Go to Feedburner and click on the feed account where you want to apply auto tweet.
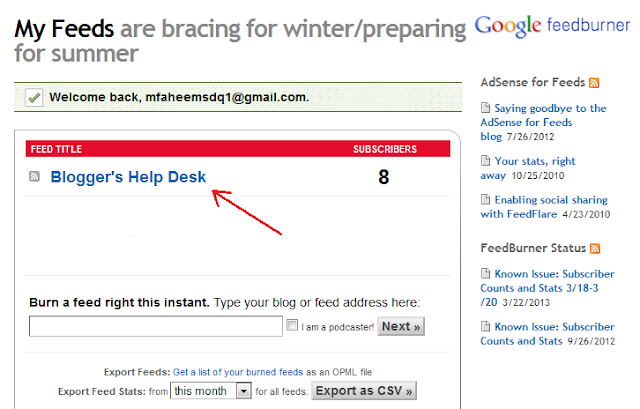
Now do the following procedure step by step:
1- Click on Publicize
2- Select Socialize from Left Sidebar Menu on Feedburner
3- Add your twitter account
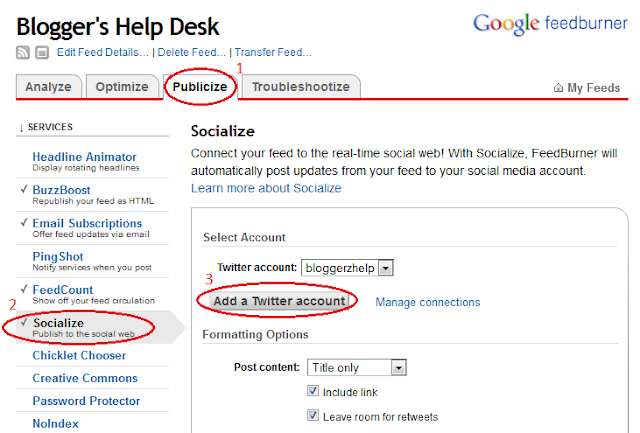
- You will be redirected to twitter login page, enter your twitter ID and password and then select "Authorize App".
- Now Keep all setting default on Feedburner page and "Activate" the facility.
- Save your settings and your all posts are ready to auto tweet.
Best Wishes!!
Wednesday, 20 March 2013
How to Show Image in Blogger Homepage But not in Post Page

Normally, when you publish the post then its image is shown by default in both homepage as well as in post page. But, mostly bloggers don't want this feature. They just want that image should be shown in homepage but when anybody click on the post to read it then image shouldn't be shown. Here is the procedure to do this phenomena.
It is very simple procedure by just adding some piece of CSS code in your blog template.
Here is the procedure, follow it step by step:
- Go to you blogger 'Dashboard', 'Template' and then 'Edit HTML'.
- Check the option 'Expand Widget Template'.
- Find the following code with 'CTRL+F'
}]]></b:skin>
- Just under this code, write the following code:
<b:if cond='data:blog.pageType != "index"'>
<style>
.hidepic{
display: none;
}
</style>
</b:if>
- Save your template, you are don it.
Remember it that, everytime you'll write the post, you have to 'Insert' pics firstly then go to the HTML option which exists on the left side in post writing. You'll have the code like this:
<div class="separator" style="clear: both; text-align: center;">
<a href="https://blogger.googleusercontent.com/img/b/R29vZ2xl/AVvXsEhGRJzm94M-ihG9KQfWdnbNEMt6iS0ECDf3OesId6hWLuT6ad64Up6AbsEQE6stB7IYfioSGC7cEcbSzX-o3pX4F-MB7AP1BOyvUW0YJOpjCb-qHppRHhgiw0G7YPYZAEnhqS1YTxE5v7M/s1600/fire_bird_by_fhrankee-d32af8v.png" imageanchor="1" style="margin-left: 1em; margin-right: 1em;"><img border="0" height="320" src="https://blogger.googleusercontent.com/img/b/R29vZ2xl/AVvXsEhGRJzm94M-ihG9KQfWdnbNEMt6iS0ECDf3OesId6hWLuT6ad64Up6AbsEQE6stB7IYfioSGC7cEcbSzX-o3pX4F-MB7AP1BOyvUW0YJOpjCb-qHppRHhgiw0G7YPYZAEnhqS1YTxE5v7M/s320/fire_bird_by_fhrankee-d32af8v.png" width="320" /></a></div>
- Finally write 'hidepic' at the place of 'separator'.
NOTE: The 'hidepic' class should be used everytime in each post means that you have to do the last step of replacing 'separator' with 'hidepic' each time when you are writing the new post.
Tuesday, 19 March 2013
How to Publish Your Blogger Post Automatically

Sometimes a blogger wishes to publish his post automatically on a specific time because of his/her activity e.g. for some event, friend's marriage etc. Blogger platform has an effective solution for this. There is a feature of schedule posting in blogger. If any author of blog wants to publish his post on a specific schedule then he just have to set the schedule with the date and time. That post will be published automatically according to the default time of his blog setting. This feature is very nice and used by a lot of bloggers because of their extra activities. With the help of this feature, you can schedule your posts of all week even whole month.
The process of scheduling a post is very simple.
1- Go to "New Post"
2- Select "Schedule" from right sidebar of blog editor.
3- Click on "Set date and time"
4- Select your desired date from calender and set the time of publishing for post.
5- Click on "Done" and "Publish" your post.
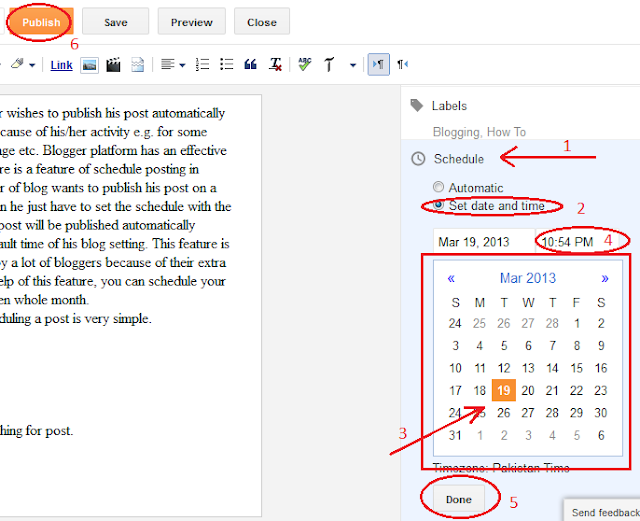
You post will be published automatically at the specif time. You can check your "Scheduled" posts in your "All Posts".
Monday, 18 March 2013
How to Add and Show Skype Emoticons in Blogger Comments

As you know the Skype emoticons are the best way to express the feelings of anyone. It'll make your page more beautiful and attractive when you'll add it in your blogger comments form.
The procedure is very easy, I'll tell you the procedure step by step. You have to follow these steps.
Here is the procedure:
- First of all go to your blogger 'Dashboard', then 'Template' and 'Edit HTML'.
- Now Check the option 'Expand Widget Templates'.
- Now, find the following code with the help of 'CTRL+F':
<h4 id='comment-post-message'><data:postCommentMsg/></h4>
- Just under it, write the following code:
<div style=' width: 370px; text-align: left; border: 2px solid #0084ce; background: #FEF9EA; padding: 10px; color:#0084ce; font-weight:bold; '>
<img border='0' src='https://blogger.googleusercontent.com/img/b/R29vZ2xl/AVvXsEhQLZZRevG_Sji2zgO5K2IrC4mJrWwrRxBES2mQgbZt4TEzpDjcHpkf7Pb32yYgKx-BhynInmxZkoYDN-B7UDVohXYKbetduvRvpUOtx1bl0YqnHskjezxMWLzmOYIYvS7TTXExyAV4JvM/s800/emoticon-0100-smile.gif'/> :a
 
<img border='0' src='https://blogger.googleusercontent.com/img/b/R29vZ2xl/AVvXsEg90F1zaum5Qv38MH9fwWqXgyjUfjbtPgXDCoPoUgw-mh8i8ChBUTYU5nc79QaywTzRqLBHJPUvaIPlK4Ra30rOIsLLV_Mbr9jxKIvI0kunKTnVQD6keiywDh6pzAmIAT_8kDBhKMFFDX4/s800/emoticon-0101-sadsmile.gif'/> :b
 
<img border='0' src='https://blogger.googleusercontent.com/img/b/R29vZ2xl/AVvXsEhKOWywUENEDL5YQkxC8ItFfdQNDxh_RTkYN1T6wQzFPCVjqZ3NdFUZJRbHgcsDYysnNGkmWh1aIqaoZ_MMCILnIO9uxidiATFEn2yTRBNsIAzlr-zoC74-GAht4whsiI-ZOFwRUr_m_5Q/s800/emoticon-0102-bigsmile.gif'/> :c
 
<img border='0' src='https://blogger.googleusercontent.com/img/b/R29vZ2xl/AVvXsEgk9_22pZpyV4oYDXwnjVcoww5pWhQI-uFYReTjROY5lGr3FI_zXNAoX0lG0tCwH_8_NV_tOpsg9CKBh6mFdJgFAtc2CKp9D5u0FICHMFZscmK08JDlUvwypwp7inSCXKudBpaGh44ff_4/s800/emoticon-0105-wink.gif'/> :d
 
<img border='0' src='https://blogger.googleusercontent.com/img/b/R29vZ2xl/AVvXsEhodPCb68NBhL1fs_nGb45AP7jY5r7EN6GC-pZwJcPLf-KQI7b3Ii-V7PJJOtNw0CPn5vkPWtxumMDc7UOkwattxQt6juer_V5RI3AJ_tF7zD9KND7gsSYch6IouX_j9MYoH4pMkkQZ9oQ/s800/emoticon-0104-surprised.gif'/> :e
 
<img border='0' src='https://blogger.googleusercontent.com/img/b/R29vZ2xl/AVvXsEiVmSotv2QzOwIoMaq4Wsdepw0e6b-smaHv2rEypal95hnhbEVsBOB6CYnI3IvzyVMMKXH4ErmHJEjM9Yno0tm4vcJ995NXFuDvkEWMJiiGGl4txy4FDE8yaXF3-4_YCIq5tEEsSuoVE6E/s800/emoticon-0106-crying.gif'/> :f
 
<img border='0' src='https://blogger.googleusercontent.com/img/b/R29vZ2xl/AVvXsEi2MKpixg48FaNJJdtudjcoMfUHeRYGD1n3-tKdsOvE423d4CnYdx9QDzn3QsjqbdNE2b-x9Xq1R3ZzHFqpsFmI4jS4JmB-FfCNjkAGgv1K7qR2qBpjdTwWEA8tf6htUTcqSUkjI1ucBy0/s800/emoticon-0109-kiss.gif'/> :g
 
<img border='0' src='https://blogger.googleusercontent.com/img/b/R29vZ2xl/AVvXsEjU1e-8KCruDlXaYVEspZgmRhtnzi22DJ_9-PcFX-QIP_JKedxaKeKza3H3WA60tIclN86szA5cQpDVaKQgfoSjWX-1coEEbhuB3EbKz1iNFzlucIYyI2jrJe0WnYugEucuUssZMoo-XjM/s800/emoticon-0111-blush.gif'/> :h
 
<img border='0' src='https://blogger.googleusercontent.com/img/b/R29vZ2xl/AVvXsEiqBwhw7fYy3IxXkhCSREuf3oVnTrhhVTOQVXm_wZFrI-oZ5r_tlKt5iwNFryXURBAlTqt4ZnjjVleLX_gGAORk70LH68AVaxiMelikeqoRiwrmxvk9_z8_RV-uMFzIADGYvHGOg0VKidg/s800/emoticon-0110-tongueout.gif'/> :i
 
<img border='0' src='https://blogger.googleusercontent.com/img/b/R29vZ2xl/AVvXsEh7ZlNhNhZhZIEqqKlrX8TzpBta2-wuhLnmMCTb7SOB6GL98qZZv4pUfyXpHaVtw_3ugpYuS8Iin1eAZfJc2jX5BTfubdJZQlGkNQ4Hc2mGP33kgeGjYD9NyiJYYrOA9tw4HkO5mhDbLho/s800/emoticon-0126-nerd.gif'/> :j
 
<img border='0' src='https://blogger.googleusercontent.com/img/b/R29vZ2xl/AVvXsEhM6Mr89RJriSxcejyNEvvFXS7XP8VAvyA8_5iDLb9y4LcbR5Xqnqc7uhB35rPQV_XIH4E2IcOjz3TGD7x_msuxY5OoofD6g74S46GRBHdGA0wPyvPYmvgFHMnHCYQDyM0lBAuwm4b6Ru0/s800/emoticon-0103-cool.gif'/> :k
 
<img border='0' src='https://blogger.googleusercontent.com/img/b/R29vZ2xl/AVvXsEiBmWV21Repy989t_-NSvcATniAVYsOf_gU-PqdS-ovLEtCxd9et0DfBEGvMQU_x-M9aUGFaVzJPlUBxyhSA4q0xPiEuWqMXVKKpLUq8w1lSl8jhNEJHc9kaUFzbSBL7h1Pq_VeL2E7ulA/s800/emoticon-0130-devil.gif'/> :l
 
<img border='0' src='https://blogger.googleusercontent.com/img/b/R29vZ2xl/AVvXsEjgzqcODwsR2nwaFFHPm3V0pXl6AXpEdid1NWZ13Uo2HKbvK7nLVtr90j_XlyqqwsQnACFHVOb6vS7n82-8DM75sUV1Uht3v3nscIRH1Y_YYi1pgu_d3GB4iBPJ6Bj62_qqXAKei-gx2Qc/s800/emoticon-0133-wait.gif'/> :m
 
<img border='0' src='https://blogger.googleusercontent.com/img/b/R29vZ2xl/AVvXsEiHl59Dl894dpOZQRxYIj19pTDQYE4sEBkfpZpjamq3t9-9EKQL9rPBXj1Gg_gYc2eHvGpKfp8KnqUP-u5-OKGbYTArCjJMrlopEYXiZb1__Qa0nqod6qSFkFROo9L2cj7KQOshe8wdDIE/s800/emoticon-0137-clapping.gif'/> :n
 
<img border='0' src='https://blogger.googleusercontent.com/img/b/R29vZ2xl/AVvXsEh-MXuXFTEuJLIrdc2whuINC7LjC9FDFya4d995Gl1AcxLSeAi3CMQivJdEB4KwqaIwH0owBw9Pbt92Vlk445cmD7hk2FjimF9gJX-fxckD4UeOWbs-INdOF2jORD7EUcxnrMFx1Cs_KUI/s800/emoticon-0136-giggle.gif'/> :o
 
<img border='0' src='https://blogger.googleusercontent.com/img/b/R29vZ2xl/AVvXsEgSlI-iMoYpSGdrR4X7-kJzU4FO5F6jxI1j6Puz6ajGiP9lnbvHrtJmB4HcB1S3qX9V4TLKB5S-dJMwCsyqGDowWYuVAd1LudWtvTZ4WilLJuTD6gEAKrVa_DkbV7h1DXDX_IbFpoC4mNs/s800/emoticon-0141-whew.gif'/> :p
 
<img border='0' src='https://blogger.googleusercontent.com/img/b/R29vZ2xl/AVvXsEjDHX39KsRxtotNOCa3qjhQYCZpywI4_SwWs5dcnzCcFgkicNzTKDLxPvQM-_IMChOE-ATODfIyb13KQRD8vCft8saHUlMenYg-jMNhDzmlNsshov1PlW0HCt8pZHCAg2uDJZZHrzRAb98/s800/emoticon-0148-yes.gif'/> :q
 
<img border='0' src='https://blogger.googleusercontent.com/img/b/R29vZ2xl/AVvXsEi9NgrJBBOKYDuTeIlq61lXnUYjxb63h_-v36sOWTv-aEbLVhxGzGbQ-SH38PdSu1FQ0RgfKUKmNnuBy5iYVxoC-0Oi5lWSBfI5kv0Kte1l75vo5kio8oIEgVcPDBCTEX09P0bi3_utQUc/s800/emoticon-0149-no.gif'/> :r
 
<img border='0' src='https://blogger.googleusercontent.com/img/b/R29vZ2xl/AVvXsEjsSCjcmD8im_SGzON6QHVWfkHTII4Cq-0EUWwhBIOVh6FpuzDg-BcpJ-xC0Kq1npjz-trkJF-H9NdWqmdY6rugS5BuQDSFdeMB8qrMB6yK9vhKLqljehKiNl8DIk6XOolWlcJ_fkvb1aI/s800/emoticon-0178-rock.gif'/> :s
 
<img border='0' src='https://blogger.googleusercontent.com/img/b/R29vZ2xl/AVvXsEh5u5B_Hzn3s_f9E7la1CVdNtxw3kjXirxzb8Xj4gYxhzx377W1MQ-dg4AWhU4Kn4vgbfs-jbYHXo8ff799Hzm75sGy0NESwrr9-C81KgNZ0kuM_XI-JE5ovHin9DM0cZ1eH2NzfpEII8I/s800/emoticon-0155-flower.gif'/> :t
</div>
- Now, Save the template. You are done, after this emoticons will be shown in reader's comment.
If you want to add Skype emoticons in Author's comments too then after saving this follow these steps:- Find </body> and just above this code write the following code:
<script type='text/javascript'>
//<![CDATA[
a = document.getElementById('comments');
if(a) {
b = a.getElementsByTagName("DD");
for(i=0; i < b.length; i++) {
if (b.item(i).getAttribute('CLASS') == 'Author-comment-body' , 'comment-body') {
_str = b.item(i).innerHTML.replace(/:j/gi, "<img src='https://blogger.googleusercontent.com/img/b/R29vZ2xl/AVvXsEh7ZlNhNhZhZIEqqKlrX8TzpBta2-wuhLnmMCTb7SOB6GL98qZZv4pUfyXpHaVtw_3ugpYuS8Iin1eAZfJc2jX5BTfubdJZQlGkNQ4Hc2mGP33kgeGjYD9NyiJYYrOA9tw4HkO5mhDbLho/s800/emoticon-0126-nerd.gif' alt='' class='smiley'/>");
_str = _str.replace(/:k/gi, "<img src='https://blogger.googleusercontent.com/img/b/R29vZ2xl/AVvXsEhM6Mr89RJriSxcejyNEvvFXS7XP8VAvyA8_5iDLb9y4LcbR5Xqnqc7uhB35rPQV_XIH4E2IcOjz3TGD7x_msuxY5OoofD6g74S46GRBHdGA0wPyvPYmvgFHMnHCYQDyM0lBAuwm4b6Ru0/s800/emoticon-0103-cool.gif' alt='' class='smiley'/>");
_str = _str.replace(/:l/gi, "<img src='https://blogger.googleusercontent.com/img/b/R29vZ2xl/AVvXsEiBmWV21Repy989t_-NSvcATniAVYsOf_gU-PqdS-ovLEtCxd9et0DfBEGvMQU_x-M9aUGFaVzJPlUBxyhSA4q0xPiEuWqMXVKKpLUq8w1lSl8jhNEJHc9kaUFzbSBL7h1Pq_VeL2E7ulA/s800/emoticon-0130-devil.gif' alt='' class='smiley'/>");
_str = _str.replace(/:m/gi, "<img src='https://blogger.googleusercontent.com/img/b/R29vZ2xl/AVvXsEjgzqcODwsR2nwaFFHPm3V0pXl6AXpEdid1NWZ13Uo2HKbvK7nLVtr90j_XlyqqwsQnACFHVOb6vS7n82-8DM75sUV1Uht3v3nscIRH1Y_YYi1pgu_d3GB4iBPJ6Bj62_qqXAKei-gx2Qc/s800/emoticon-0133-wait.gif' alt='' class='smiley'/>");
_str = _str.replace(/:n/gi, "<img src='https://blogger.googleusercontent.com/img/b/R29vZ2xl/AVvXsEiHl59Dl894dpOZQRxYIj19pTDQYE4sEBkfpZpjamq3t9-9EKQL9rPBXj1Gg_gYc2eHvGpKfp8KnqUP-u5-OKGbYTArCjJMrlopEYXiZb1__Qa0nqod6qSFkFROo9L2cj7KQOshe8wdDIE/s800/emoticon-0137-clapping.gif' alt='' class='smiley'/>");
_str = _str.replace(/:o/gi, "<img src='https://blogger.googleusercontent.com/img/b/R29vZ2xl/AVvXsEh-MXuXFTEuJLIrdc2whuINC7LjC9FDFya4d995Gl1AcxLSeAi3CMQivJdEB4KwqaIwH0owBw9Pbt92Vlk445cmD7hk2FjimF9gJX-fxckD4UeOWbs-INdOF2jORD7EUcxnrMFx1Cs_KUI/s800/emoticon-0136-giggle.gif' alt='' class='smiley'/>");
_str = _str.replace(/:p/gi, "<img src='https://blogger.googleusercontent.com/img/b/R29vZ2xl/AVvXsEgSlI-iMoYpSGdrR4X7-kJzU4FO5F6jxI1j6Puz6ajGiP9lnbvHrtJmB4HcB1S3qX9V4TLKB5S-dJMwCsyqGDowWYuVAd1LudWtvTZ4WilLJuTD6gEAKrVa_DkbV7h1DXDX_IbFpoC4mNs/s800/emoticon-0141-whew.gif' alt='' class='smiley'/>");
_str = _str.replace(/:q/gi, "<img src='https://blogger.googleusercontent.com/img/b/R29vZ2xl/AVvXsEjDHX39KsRxtotNOCa3qjhQYCZpywI4_SwWs5dcnzCcFgkicNzTKDLxPvQM-_IMChOE-ATODfIyb13KQRD8vCft8saHUlMenYg-jMNhDzmlNsshov1PlW0HCt8pZHCAg2uDJZZHrzRAb98/s800/emoticon-0148-yes.gif' alt='' class='smiley'/>");
_str = _str.replace(/:r/gi, "<img src='https://blogger.googleusercontent.com/img/b/R29vZ2xl/AVvXsEi9NgrJBBOKYDuTeIlq61lXnUYjxb63h_-v36sOWTv-aEbLVhxGzGbQ-SH38PdSu1FQ0RgfKUKmNnuBy5iYVxoC-0Oi5lWSBfI5kv0Kte1l75vo5kio8oIEgVcPDBCTEX09P0bi3_utQUc/s800/emoticon-0149-no.gif' alt='' class='smiley'/>");
_str = _str.replace(/:s/gi, "<img src='https://blogger.googleusercontent.com/img/b/R29vZ2xl/AVvXsEh5u5B_Hzn3s_f9E7la1CVdNtxw3kjXirxzb8Xj4gYxhzx377W1MQ-dg4AWhU4Kn4vgbfs-jbYHXo8ff799Hzm75sGy0NESwrr9-C81KgNZ0kuM_XI-JE5ovHin9DM0cZ1eH2NzfpEII8I/s800/emoticon-0155-flower.gif' alt='' class='smiley'/>");
_str = _str.replace(/:t/gi, "<img src='https://blogger.googleusercontent.com/img/b/R29vZ2xl/AVvXsEjsSCjcmD8im_SGzON6QHVWfkHTII4Cq-0EUWwhBIOVh6FpuzDg-BcpJ-xC0Kq1npjz-trkJF-H9NdWqmdY6rugS5BuQDSFdeMB8qrMB6yK9vhKLqljehKiNl8DIk6XOolWlcJ_fkvb1aI/s800/emoticon-0178-rock.gif' alt='' class='smiley'/>");
_str = _str.replace(/:a/gi, "<img src='https://blogger.googleusercontent.com/img/b/R29vZ2xl/AVvXsEhQLZZRevG_Sji2zgO5K2IrC4mJrWwrRxBES2mQgbZt4TEzpDjcHpkf7Pb32yYgKx-BhynInmxZkoYDN-B7UDVohXYKbetduvRvpUOtx1bl0YqnHskjezxMWLzmOYIYvS7TTXExyAV4JvM/s800/emoticon-0100-smile.gif' alt='' class='smiley'/>");
_str = _str.replace(/:b/gi, "<img src='https://blogger.googleusercontent.com/img/b/R29vZ2xl/AVvXsEg90F1zaum5Qv38MH9fwWqXgyjUfjbtPgXDCoPoUgw-mh8i8ChBUTYU5nc79QaywTzRqLBHJPUvaIPlK4Ra30rOIsLLV_Mbr9jxKIvI0kunKTnVQD6keiywDh6pzAmIAT_8kDBhKMFFDX4/s800/emoticon-0101-sadsmile.gif' alt='' class='smiley'/>");
_str = _str.replace(/:c/gi, "<img src='https://blogger.googleusercontent.com/img/b/R29vZ2xl/AVvXsEhKOWywUENEDL5YQkxC8ItFfdQNDxh_RTkYN1T6wQzFPCVjqZ3NdFUZJRbHgcsDYysnNGkmWh1aIqaoZ_MMCILnIO9uxidiATFEn2yTRBNsIAzlr-zoC74-GAht4whsiI-ZOFwRUr_m_5Q/s800/emoticon-0102-bigsmile.gif' alt='' class='smiley'/>");
_str = _str.replace(/:d/gi, "<img src='https://blogger.googleusercontent.com/img/b/R29vZ2xl/AVvXsEgk9_22pZpyV4oYDXwnjVcoww5pWhQI-uFYReTjROY5lGr3FI_zXNAoX0lG0tCwH_8_NV_tOpsg9CKBh6mFdJgFAtc2CKp9D5u0FICHMFZscmK08JDlUvwypwp7inSCXKudBpaGh44ff_4/s800/emoticon-0105-wink.gif' alt='' class='smiley'/>");
_str = _str.replace(/:e/gi, "<img src='https://blogger.googleusercontent.com/img/b/R29vZ2xl/AVvXsEhodPCb68NBhL1fs_nGb45AP7jY5r7EN6GC-pZwJcPLf-KQI7b3Ii-V7PJJOtNw0CPn5vkPWtxumMDc7UOkwattxQt6juer_V5RI3AJ_tF7zD9KND7gsSYch6IouX_j9MYoH4pMkkQZ9oQ/s800/emoticon-0104-surprised.gif' alt='' class='smiley'/>");
_str = _str.replace(/:f/gi, "<img src='https://blogger.googleusercontent.com/img/b/R29vZ2xl/AVvXsEiVmSotv2QzOwIoMaq4Wsdepw0e6b-smaHv2rEypal95hnhbEVsBOB6CYnI3IvzyVMMKXH4ErmHJEjM9Yno0tm4vcJ995NXFuDvkEWMJiiGGl4txy4FDE8yaXF3-4_YCIq5tEEsSuoVE6E/s800/emoticon-0106-crying.gif' alt='' class='smiley'/>");
_str = _str.replace(/:g/gi, "<img src='https://blogger.googleusercontent.com/img/b/R29vZ2xl/AVvXsEi2MKpixg48FaNJJdtudjcoMfUHeRYGD1n3-tKdsOvE423d4CnYdx9QDzn3QsjqbdNE2b-x9Xq1R3ZzHFqpsFmI4jS4JmB-FfCNjkAGgv1K7qR2qBpjdTwWEA8tf6htUTcqSUkjI1ucBy0/s800/emoticon-0109-kiss.gif' alt='' class='smiley'/>");
_str = _str.replace(/:h/gi, "<img src='https://blogger.googleusercontent.com/img/b/R29vZ2xl/AVvXsEjU1e-8KCruDlXaYVEspZgmRhtnzi22DJ_9-PcFX-QIP_JKedxaKeKza3H3WA60tIclN86szA5cQpDVaKQgfoSjWX-1coEEbhuB3EbKz1iNFzlucIYyI2jrJe0WnYugEucuUssZMoo-XjM/s800/emoticon-0111-blush.gif' alt='' class='smiley'/>");
_str = _str.replace(/:i/ig,"<img src='https://blogger.googleusercontent.com/img/b/R29vZ2xl/AVvXsEiqBwhw7fYy3IxXkhCSREuf3oVnTrhhVTOQVXm_wZFrI-oZ5r_tlKt5iwNFryXURBAlTqt4ZnjjVleLX_gGAORk70LH68AVaxiMelikeqoRiwrmxvk9_z8_RV-uMFzIADGYvHGOg0VKidg/s800/emoticon-0110-tongueout.gif' alt='' class='smiley'/>")
b.item(i).innerHTML = _str;
}
}
}
//]]>
</script>
- Now save your template and see the new and nice change. Skype emoticons will be shown in both reader's and author's comments.
Saturday, 16 March 2013
How to Add Facebook Like Button in Blogger Under the Post Titles

This is another tip to increase your site traffic. When you'll add this Facebook button below the post title and somebody likes your post then it will be shared to his friends and you site will be know his friends too and when his friends likes your any post then it will be shared to their friends and so on. They will visit your blog site daily after that and your site will be familiar soon and definitely your page views will increase.
I'll tell you now that how can you add the Facebook like button under you post.
Here is the procedure:
- Go to you blogger 'Dashboard', then 'Template' and finally 'Edit HTML'.
- Then check 'Edit Widget Templates' option.
- Now search this code with 'CTRL+F'
<data:post.body/>
- Now, just above this code write the following code:
<p><iframe allowTransparency='true' expr:src='"http://www.facebook.com/plugins/like.php?href=" + data:post.url + "&layout=button_count&show_faces=false&width=100& action=like&font=arial&colorscheme=light"' frameborder='0' scrolling='no' style='border:none; overflow:hidden; width:100px; height:20px;'/></p>
- Finally, save your template and check it.
How to Delete Threaded Comments in Blogger

There are two levels of comments, Single level and two levels commenting. Single level commenting allow a reader to write a comment on the post and two levels commenting is the original comment and replies to that comment. Blogger is supporting two levels commenting.
Threaded comments allow a reader to reply another reader on the post.
You can avoid this feature and delete the threaded comments, today I'll tell you how?
Here is the procedure to avoid this feature:
- Firstly, you have to go to your blogger 'Dashboard', then 'Template' and finally 'Edit HTML'.
- Now check the 'Expand Widget Templates' option on the top of the page.
- Now Search the following code with 'CTRL+F'
<b:if cond='data:post.showThreadedComments'>
<b:if cond='data:post.showThreadedComments'>
<b:include data='post' name='threaded_comments'/>
<b:else/>
<b:include data='post' name='comments'/>
</b:if>
</b:if>
<b:if cond='data:blog.pageType == "item"'>
<b:if cond='data:post.showThreadedComments'>
<b:include data='post' name='threaded_comments'/>
<b:else/>
<b:include data='post' name='comments'/>
</b:if>
</b:if>
- You'll find this code twice, you have to remove this code twice and replace it twice with following code:
<b:include data='post' name='comments'/>
</b:if>
<b:if cond='data:blog.pageType == "item"'>
<b:include data='post' name='comments'/>
</b:if>
- Now, Save your template and you'll see that there is no threaded comments.
Wednesday, 13 March 2013
How to Add First Big Letter (Drop Cap Letter) in Blogger

Today I'll tell you the way that how can you add or create first big letter in your each post. Sometimes it looks very beautiful as show in the picture that the very first letter of the post is larger than other words. This is also called 'Drop Cap Letter'. The drop cap letter can have different colour and font size than rest of the words of post. Drop cap letter can also be shown in comments.
Now let's start it. Before doing this you have to get and save the backup.
- First of all go to your blogger 'Dashboard' then in 'Template' , 'Edit HTML' then you have HTML file then on the top of file you'll have the option 'Expand Widget Template', check this option.
- Now search the following code with CTRL+F:
]]></b:skin>
- Add the following code, just above mentioned code:
.capital:first-letter {
float: left;
display: block;
font-family: Times, serif, Georgia;
font-size: 40px;
color: #000000;
margin:0px 5px 0 0;
padding:0 0 0 10px;
}
In this code 40px is Size of letter you can decrease or increase it according to you desire and
#000000 is Value of color you also set it with your desired colour value.
- After adding above code, search the following code:
<data:post.body/>
- Then before and after the above code write the following code (in colour) like this:
<div class='capital'><data:post.body/></div>
- Finally, save your template.
I hope above mentioned code (<div class='capital'><data:post.body/></div>) will work for you, In case of not working this code you can check one of these code:
<p class="capital"><data:post.body/></p>
OR
<span class="capital"><data:post.body/></span>
Then save template and I am sure it will work for you. Apply this in you blog and enjoy it.
Monday, 11 March 2013
How to Add Related Post Gadget with Thumbnail in Blogger
 The related posts are those post which will come beneath of the post and these are posts which are related to that post. Most likely related posts are shown in form of 'You may also like this' or 'You might also like these posts'. This is a very good way to keep your visitor busy with your blogger site to display the related posts on your site. If the related posts are with thumbnail then it attracts the user or visitor around the site and it is very smart thinking. The related posts are chosen from the same category, label or tag. Here is the procedure to show the related post gadget with thumbnail for bloggers.
These are the steps to add this gadget.
- First of all you have to log in within your blogger site and then go to LinkWithin site (or you can click here on LinkWithin), after that you'll get a page, on that page your concern part is following:
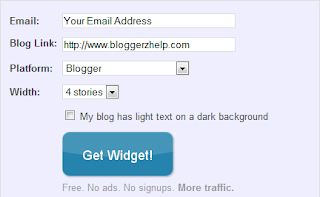
As shown in this part, you have to write your email address which is attached with your blogger and write down your blog link, in 'Platform' you have to choose Blogger, the last one is 'Width' option and in this option you can choose the number of related posts according to your space which will be shown after add this gadget. Finally, click on 'Get Widget'.
- After click on 'Get Widget' you'll have this option:
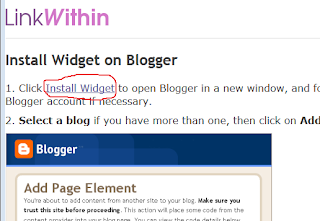
In this part you have to click on 'install widget' option as marked in above portion.
- When you'll click on 'install widget' then you'll have the page like this:
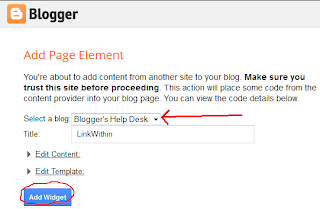
In this part you have to select the blog if you have more than one blog, if you are logged in already in your desired blog then you'll see your blog name automatically. After this, write the 'Title' which is LinkWithin. Now, click on 'Add Widget'.
- After click on 'Add Widget', this gadget will automatically add in your blogger site with the name 'LinkWithin' and you'll get your blogger 'Layout' page. On that page this gadget in somewhere on your blog, most probably on the top of your blog, find 'LinkWithin', drag it to the bottom of 'Blog Posts' and drop it like this:
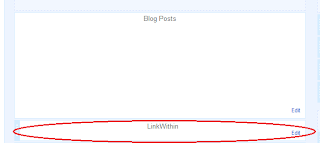
- After doing the above step finally you have have to save this arrangement in your blog:
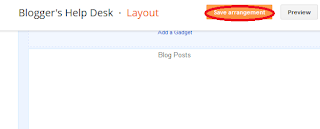
You'll find this option on the top. Click on it and save it. This saved settings will be applied
Now, check your blog and you can see the related posts with thumbnail under each post.
Saturday, 9 March 2013
How to Add Favicon In Blogger Blog
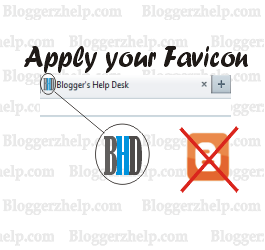 Favicon appears on the title bar of a web page. Usually, each website has its own favicon which is related to their header logo. In blogger, whenever you create new blog then you can see the blogger default logo as favicon on the title bar of the page. You can change this manually by following some simple steps.
Before applying your own favicon, you must keep some things in mind.
- Your favicon must be a size of 32x32 px.
- It is recommended that the format should be .png.
- Always use minimum words so that it can be easily viewable on the title bar.
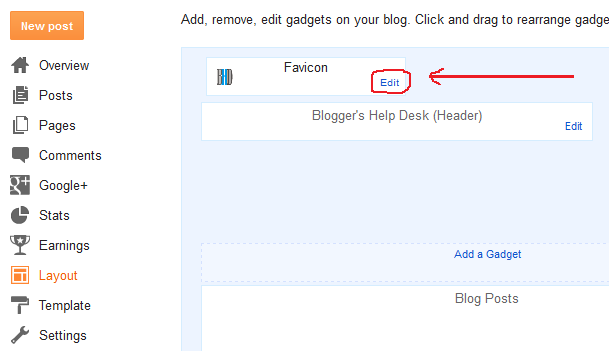
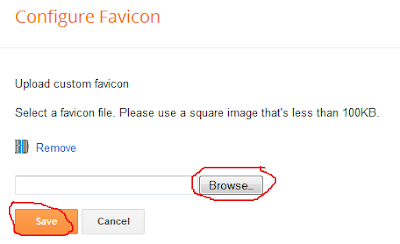
Browse your favicon of 32x32 px and click on Save.
Now check your webpage.
Alternative Method
If you are unable to see your favicon on the title bar then you have to use this method, then you can easily see your own favicon on the title bar of your blog.Go to blogger Dashboard > Template
Click on "Edit HTML" and search the following:
<b:skin><
Social media has become very necessary for all blogger because of great response and result in huge traffic. Connecting to social media increases the life of a website or blog. Management and navigation from blogger to different social media is very difficult and time consuming for the bloggers. HootSuite has cut down this difficulty and provide a single platform with all social media management. You can not only connect to all social media but also can install apps like Blogger and Wordpress. Another benefit of these apps is that you can also create new post, schedule it and even edit all older posts within a single platform having control of all your social media pages. This will reduce your difficulty and save your time. There are very easy steps to create account with HootSuite and connecting to your social media.
- Go to HootSuite and create your new account with your email or using your facebook account.
- After creating account, the first step is to connect this with your social media page e.g. twitter. You can also connect with facebook, Linkedin or any other social media.

- Now if you want to add another social media page then select it from your profile (Where you can see your Full Name), from above drop down profile selection option (clicking on + mark) or by selection option "Add a Social Network" from My Social Networks menu on profile page.

- After connecting the social media e.g. facebook, you can select any of your page.
Now if you want to install any application like Blogger or Wordpress, then click on "Add Stream" option from any tab.

- Now select "Apps" and click on "Visit the App Directory"

- From there you can install your desired Apps like Wordpress and Blogger. For example, if you want to install Blogger then click on "Install App" on the Blogger app name in the directory list.


- You can see new tab with app "Blogger". Connect to your blogger and allow access. Select any blog that you want to connect (if you have more than one blog).
Now you can create, manage your post along with your all social media activities.
Have fun with best wishes..!!
Saturday, 23 February 2013
How to Write The Best Optimized Post Titles for Blogger
 Traffic from Search Engines is very important for a blog because the mostly traffic, a blog gets, has a source as search engines like Google, Bing and Yahoo. All search engines filter the blog from the title of posts. We can say that about 90% traffic from search engines depend on the contents of a post title. Although the post contents are also valuable but they have second priority. So if your post title is well optimized then your post will get high rank in Google Search Engine Directory and obviously your blog will also get higher Alexa traffic rank because of such optimized posts.
It is very important to make keen attention while writing your post title. There are some key points to optimize your blog post title and enable it to get attraction from the searchers.
Never Increase The Length of Title Characters Than 65
Remember that if your blog post title has more than 65 characters then Google will chop the rest of title. If you will keep the title under 65 characters then it will become more considerable and attractive for searcher. Also remember that spaces between words will count as character. Lets see this example from search engine results:

In the above snapshot you can see the post title ending with (...). In this title, Google has chopped the rest of characters.

You can see the above post with complete title without chopping.
Use Google Search Suggestion for Best Post Title
You can also use the Google Search suggestion for your best post title. Just go to Google page and type words from your desired post title. Google will suggest you with some sentences. These are the mostly searched sentences regarding to that words. And whenever a searcher write some keywords then he also prefer to select the Google suggested keywords.
So this will be best post title for you.

Best Wishes!!!
Friday, 22 February 2013
What is Permalink in Blogger and How to Use it?

Permalink is also called Permanent Link. This is the link of your post. Every post of your blog has its own unique permalink. The permalink is assigned according to the blog link, year and date.
Whenever you open a post of any blog, you can see the year and month within that link. The post link consists of blog home URL, post publishing year, month and ending with some words separated with hyphen (-). These words are fetched from the starting text of the post (from post title). The permalink takes normally a maximum of eight (8) words from the title and neglect the rest of. So the full form of a post title is in the following format:
http://blogurl.com/Year/Month/starting-words-from-title.html
Lets take the example form this post. The permalink of this post will be:
http://www.bloggerzhelp.com/2013/02/what-is-permalink-in-blogger-and-how-to.html
There are two types of permalink:
- Automatic Permalink
- Custom Permalink
Automatic Permalink
Automatic Permalink is created by blogger automatically. Almost 98% bloggers use automatically assigned permalink. The automatically assigned permalink has very length because of automatically fetched maximum words from the post title. That's why an automatic permalink is meaningless because of a maximum limit of words. You can check your permalink setting from "Post settings under Permalink Tag.

You will check the automatic permalink from here because it is selected by default.

The selected portion of link is assigned automatically from blogger.
Custom Permalink
You can assign your own permalink according to your need to make it meaningful. Another benefit of custom assign permalink is that your post link become shorter than automatic permalink. To assign a custom permalink, select "Custom Permalink" option and write the words according to your post. Remember that spaces and special characters are not allowed in this portion. You have to put hyphen (-) to separate the words.

Now click on "Done" and publish your post with your own custom and SEO friendly permalink.
Best Wishes.
Sunday, 17 February 2013
How to Convert Blogger and Wordpress Posts into PDF Book
 Blogging has become very popular now a days. We view a lot of new blogs every day and they are also increasing. There are many types of blogs such as blogging tricks, technology, sports, games, software etc. Many bloggers believe in original contents and therefore they like to write them for their own blog.
There may be a wish of some bloggers to save their work/posts within their own access without internet and they can read them or show them to their friends or family without connecting internet. It is difficult to navigate between offline pages if they save their posts. Today I will tell you all about the apps with the help of which you can save your all posts in .pdf format (Adobe Reader). In this way, you can create your own E-Book of your blog. The process is very simple and easy, just follow the steps.
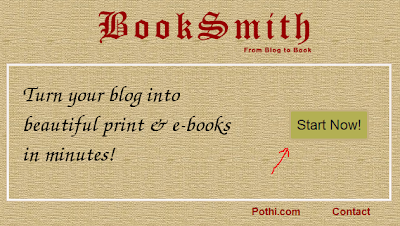
- To create ebook of your blog visit Blog2Book and click on Start Now button
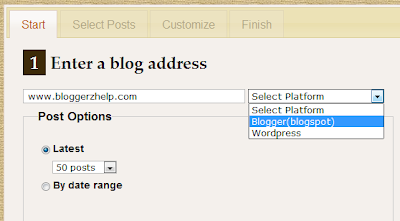
- Now you are required to enter blog address e.g. www.bloggerzhelp.com and then you have to select a platform such as Blogger(Blogspot) or Wordpress.
- You can select post options of your choice e.g. Latest or By date range. You can select upto 100 posts. It means that you can create a PDF book of upto 100 posts.
After Selecting the post's range then click on "Get the Posts".
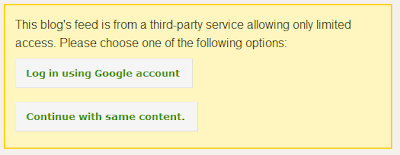
- Now you are required to login to your Google account or continue it. If you are owner of the blog, then you can login otherwise you can continue it. (You must use this fairly for just reading purpose and do not misuse of this ebook as it is against the copyright law).
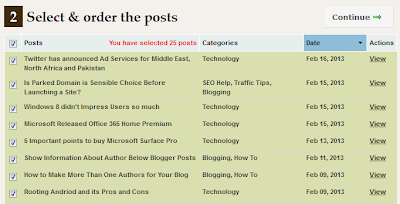
- Now you can select your require posts and change the order of post by dragging and dropping accordingly. Then click on "Continue".
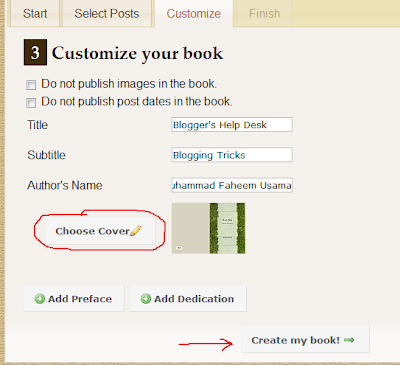
- You can manage the posts for ebook e.g. image and date appearance by checking the boxes. For the cover of book, you can also write a subtitle and Author's Name. Select your ebook cover from given covers and then click on "Create My Book!"
You have to wait for some moments, then you can view your ebook. You can download this ebook by clicking on "Download e-book!".
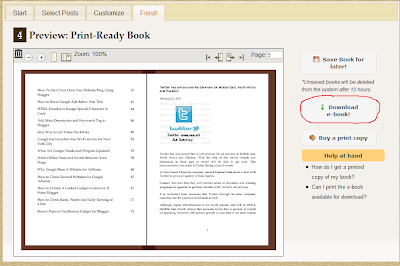
Amazing or not? I have liked this apps, hope so helpful for you too.
Happy Blogging with best wishes...!!!
Subscribe to:
Posts
(
Atom
)


