

Showing posts with label Template Design. Show all posts
Thursday, 11 April 2013
How to Apply Read More Option to All Posts Automatically in Blogger


You have noticed that almost every blog has Read More button on the posts which are displaying on home page. These posts have excerpt function to make the posts short on the home page for wider coverage of posts.
In blogger, there is no excerpt function for posts by default. That's why, a simple blogger template always displays full post. Because of full length post on home page, the length of the page has been increased or the home page covers only 2 or 3 posts maximum. Some custom blogger templates has the excerpt function for the posts.
If you will apply this function then home page can cover more posts with equal size and space. Another benefit of this function is that it causes to increase the charm and beauty of your blog layout.
If you are using a template which does not have the read more function, then you can easily apply this function for your current template. Simply follow the steps:
1- Go to blogger dashboard and choose "Template" and then click on "Edit HTML"
2- Press "Ctrl+F" and use Template Editor search area for searching </head> and press Enter
(Note: Click on the template code area and then press "Ctrl+F")

Now Just above the </head> tag, paste the following code.
<script type='text/javascript'>
summary_noimg = 250;
summary_img = 200;
img_thumb_height = 150;
img_thumb_width = 150;
</script>
<script type='text/javascript'>
//<![CDATA[
function removeHtmlTag(strx,chop){
if(strx.indexOf("<")!=-1)
{
var s = strx.split("<");
for(var i=0;i<s.length;i++){
if(s[i].indexOf(">")!=-1){
s[i] = s[i].substring(s[i].indexOf(">")+1,s[i].length);
}
}
strx = s.join("");
}
chop = (chop < strx.length-1) ? chop : strx.length-2;
while(strx.charAt(chop-1)!=' ' && strx.indexOf(' ',chop)!=-1) chop++;
strx = strx.substring(0,chop-1);
return strx+'...';
}
function createSummaryAndThumb(pID){
var div = document.getElementById(pID);
var imgtag = "";
var img = div.getElementsByTagName("img");
var summ = summary_noimg;
if(img.length>=1) {
imgtag = '<span style="float:left; padding:0px 10px 5px 0px;"><img src="'+img[0].src+'" width="'+img_thumb_width+'px" height="'+img_thumb_height+'px"/></span>';
summ = summary_img;
}
var summary = imgtag + '<div>' + removeHtmlTag(div.innerHTML,summ) + '</div>';
div.innerHTML = summary;
}
//]]>
</script>
Now Search for <data:post.body/> and replace it with the following code:
<b:if cond='data:blog.pageType != "static_page"'>
<b:if cond='data:blog.pageType != "item"'>
<div expr:id='"summary" + data:post.id'><data:post.body/></div>
<script type='text/javascript'>createSummaryAndThumb("summary<data:post.id/>");</script>
</b:if>
</b:if>
<b:if cond='data:blog.pageType == "item"'><data:post.body/></b:if>
<b:if cond='data:blog.pageType == "static_page"'><data:post.body/></b:if>
<b:if cond='data:blog.pageType != "static_page"'>
<b:if cond='data:blog.pageType != "item"'>
<div style='float:right;margin-right:10px;margin-top:5px;'>
<a expr:href='data:post.url'>Read More</a>
</div>
</b:if>
</b:if>
Now "Save template" and check the work.
Important Notes:
You can change the thumbnail size and number of character before Read More option of your choice.
summary_noimg = Increase the characters if your post have no image.
summary_img = These characters are apply on posts with images
img_thumb_height = This will apply for the height of your post thumbnail on home page
img_thumb_width = This option will work for the width of your post's image on home page.
Wednesday, 10 April 2013
How to Work With New Blogger Template HTML Editor

Blogger has recently changed the HTML editor. Now if you open your Template setting and click on the Edit HTML, you will find a completely changed layout. Blogger HTML Editor has been changed having some new extra features and functions. This new editor reduces the blogger's over work and problems which some of bloggers have been facing in old editor.
This new editor has the functions like Jump to Widget, Preview template, Revert changes, Revert widget templates to default and format template. Lets discuss all of them briefly so that you can work easily and without hesitation with this new editor.
Jump to Widget:
This function will take you to the selected widget area within the template code. This function will show your all widgets which are currently using within your template.
Preview Template:
You can preview your template after applying some new features or changing. The preview will appear on the same page instead of html code.
Revert changes:
You can easily revert the change which you have applied to your template. Remember that do not save your template. Use preview template function to check the apply changes. If you save the template, you can not revert.
Format Template:
This function will arrange your template code in proper way and clean up the indentation of the template. You must apply this instantly without hesitation.
Benefit of the new Editor over older one:
Following are the benefit/function which are useful in new editor:
Line Numbering:
This will helpful to go to the line which have some error.
No Need to Expand Widget Template:
Unlike older editor, there is no need to expand the widget template, so this function has been obsolete.
Save Change Affection:
In older editor, if you applied save change, then the editor took you to the top of the editor. But in new editor, you will stay at the save line in the editor where you were before the saving.
Friday, 29 March 2013
How to Add Email Subscription Box in Blogger

This tip can help you to increase your number of regular users and also increase the number of page views. When you put useful things and information in your blog then many people want to join your site to get the daily update news and information from your blog. For this purpose you have to add the email subscription form or box into your blog so that they can easily get the updates of your blog.
Here is the procedure that how can you add this box into your own blog. For this purpose, follow these steps:
- First of all go to your blogger 'Dashboard'.
- Then go to 'Layout' and click on 'Add a Gadegt' option.
- You'll have a pop-up window, from this window find and click on 'HTML/JavaScript' option.
- Then you'll have an empty box. Don't write anything in 'title' option just under the title option write the following code:
<style>
.hl-email{
background:url(https://blogger.googleusercontent.com/img/b/R29vZ2xl/AVvXsEi4KVTA4Wh9M_sLfLJYynbjIFf6k1nbputAp8c09yGkx63L58uyEXLsaRRdFdFaYZALMik4A1wjGMz6ukI8IsQW2sXFuwouXcjq70gDsnSdGyzil2GX8TDAGK1JtLRryxrJ2S-GOv9EemM/s1600/mail.png) no-repeat 0px 12px ;
width:300px;
padding:10px 0 0 55px;
float:left;
font-size:1.4em;
font-weight:bold;
margin:0 0 10px 0;
color:#686B6C;
}
.hl-emailsubmit{
background:#9B9895;
cursor:pointer;
color:#fff;
border:none;
padding:3px;
text-shadow:0 -1px 1px rgba(0,0,0,0.25);
-moz-border-radius:6px;
-webkit-border-radius:6px;
border-radius:6px;
font:12px sans-serif;
}
.hl-emailsubmit:hover{
background:#E98313;
}
.textarea{
padding:2px;
margin:6px 2px 6px 2px;
background:#f9f9f9;
border:1px solid #ccc;
resize:none;
box-shadow:inset 1px 1px 1px rgba(0,0,0,0.1);
-moz-box-shadow:inset 1px 1px 1px rgba(0,0,0,0.1);
-webkit-box-shadow:inset 1px 1px 1px rgba(0,0,0,0.1); font-size:13px;
width:150px;
color:#666;}
</style>
<div class="hl-email">
Subscribe via Email <form action="http://feedburner.google.com/fb/a/mailverify" id="feedform" method="post" target="popupwindow" onsubmit="window.open('http://feedburner.google.com/fb/a/mailverify?uri=bloggerzhelp', 'popupwindow', 'scrollbars=yes,width=550,height=520');return true">
<input gtbfieldid="3" class="textarea" name="email" onblur="if (this.value == "") {this.value = "Enter email address here";}" onfocus="if (this.value == "Enter email address here") {this.value = "";}" value="Enter email address here" type="text" />
<input type="hidden" value="bhd" name="uri"/><input type="hidden" name="loc" value="en_US"/>
<input class="hl-emailsubmit" value="Submit" type="submit" />
</form>
</div>
Customization:
- Replace the URL for your desired email icon in Pink colour portion.
- Adjust the value of text area according to your own in 150 place.
- Set your own Feedburner email feed link in place of Red portion.
- Replace 'bhd' with your feed title. You ca get it at the end of your feed link.
Now you are done, save your widget and set it on your page layout and then click on 'Save arrangements'. Check your blog and enjoy with this feature.
Wednesday, 20 March 2013
How to Show Image in Blogger Homepage But not in Post Page

Normally, when you publish the post then its image is shown by default in both homepage as well as in post page. But, mostly bloggers don't want this feature. They just want that image should be shown in homepage but when anybody click on the post to read it then image shouldn't be shown. Here is the procedure to do this phenomena.
It is very simple procedure by just adding some piece of CSS code in your blog template.
Here is the procedure, follow it step by step:
- Go to you blogger 'Dashboard', 'Template' and then 'Edit HTML'.
- Check the option 'Expand Widget Template'.
- Find the following code with 'CTRL+F'
}]]></b:skin>
- Just under this code, write the following code:
<b:if cond='data:blog.pageType != "index"'>
<style>
.hidepic{
display: none;
}
</style>
</b:if>
- Save your template, you are don it.
Remember it that, everytime you'll write the post, you have to 'Insert' pics firstly then go to the HTML option which exists on the left side in post writing. You'll have the code like this:
<div class="separator" style="clear: both; text-align: center;">
<a href="https://blogger.googleusercontent.com/img/b/R29vZ2xl/AVvXsEhGRJzm94M-ihG9KQfWdnbNEMt6iS0ECDf3OesId6hWLuT6ad64Up6AbsEQE6stB7IYfioSGC7cEcbSzX-o3pX4F-MB7AP1BOyvUW0YJOpjCb-qHppRHhgiw0G7YPYZAEnhqS1YTxE5v7M/s1600/fire_bird_by_fhrankee-d32af8v.png" imageanchor="1" style="margin-left: 1em; margin-right: 1em;"><img border="0" height="320" src="https://blogger.googleusercontent.com/img/b/R29vZ2xl/AVvXsEhGRJzm94M-ihG9KQfWdnbNEMt6iS0ECDf3OesId6hWLuT6ad64Up6AbsEQE6stB7IYfioSGC7cEcbSzX-o3pX4F-MB7AP1BOyvUW0YJOpjCb-qHppRHhgiw0G7YPYZAEnhqS1YTxE5v7M/s320/fire_bird_by_fhrankee-d32af8v.png" width="320" /></a></div>
- Finally write 'hidepic' at the place of 'separator'.
NOTE: The 'hidepic' class should be used everytime in each post means that you have to do the last step of replacing 'separator' with 'hidepic' each time when you are writing the new post.
Monday, 18 March 2013
How to Add and Show Skype Emoticons in Blogger Comments

As you know the Skype emoticons are the best way to express the feelings of anyone. It'll make your page more beautiful and attractive when you'll add it in your blogger comments form.
The procedure is very easy, I'll tell you the procedure step by step. You have to follow these steps.
Here is the procedure:
- First of all go to your blogger 'Dashboard', then 'Template' and 'Edit HTML'.
- Now Check the option 'Expand Widget Templates'.
- Now, find the following code with the help of 'CTRL+F':
<h4 id='comment-post-message'><data:postCommentMsg/></h4>
- Just under it, write the following code:
<div style=' width: 370px; text-align: left; border: 2px solid #0084ce; background: #FEF9EA; padding: 10px; color:#0084ce; font-weight:bold; '>
<img border='0' src='https://blogger.googleusercontent.com/img/b/R29vZ2xl/AVvXsEhQLZZRevG_Sji2zgO5K2IrC4mJrWwrRxBES2mQgbZt4TEzpDjcHpkf7Pb32yYgKx-BhynInmxZkoYDN-B7UDVohXYKbetduvRvpUOtx1bl0YqnHskjezxMWLzmOYIYvS7TTXExyAV4JvM/s800/emoticon-0100-smile.gif'/> :a
 
<img border='0' src='https://blogger.googleusercontent.com/img/b/R29vZ2xl/AVvXsEg90F1zaum5Qv38MH9fwWqXgyjUfjbtPgXDCoPoUgw-mh8i8ChBUTYU5nc79QaywTzRqLBHJPUvaIPlK4Ra30rOIsLLV_Mbr9jxKIvI0kunKTnVQD6keiywDh6pzAmIAT_8kDBhKMFFDX4/s800/emoticon-0101-sadsmile.gif'/> :b
 
<img border='0' src='https://blogger.googleusercontent.com/img/b/R29vZ2xl/AVvXsEhKOWywUENEDL5YQkxC8ItFfdQNDxh_RTkYN1T6wQzFPCVjqZ3NdFUZJRbHgcsDYysnNGkmWh1aIqaoZ_MMCILnIO9uxidiATFEn2yTRBNsIAzlr-zoC74-GAht4whsiI-ZOFwRUr_m_5Q/s800/emoticon-0102-bigsmile.gif'/> :c
 
<img border='0' src='https://blogger.googleusercontent.com/img/b/R29vZ2xl/AVvXsEgk9_22pZpyV4oYDXwnjVcoww5pWhQI-uFYReTjROY5lGr3FI_zXNAoX0lG0tCwH_8_NV_tOpsg9CKBh6mFdJgFAtc2CKp9D5u0FICHMFZscmK08JDlUvwypwp7inSCXKudBpaGh44ff_4/s800/emoticon-0105-wink.gif'/> :d
 
<img border='0' src='https://blogger.googleusercontent.com/img/b/R29vZ2xl/AVvXsEhodPCb68NBhL1fs_nGb45AP7jY5r7EN6GC-pZwJcPLf-KQI7b3Ii-V7PJJOtNw0CPn5vkPWtxumMDc7UOkwattxQt6juer_V5RI3AJ_tF7zD9KND7gsSYch6IouX_j9MYoH4pMkkQZ9oQ/s800/emoticon-0104-surprised.gif'/> :e
 
<img border='0' src='https://blogger.googleusercontent.com/img/b/R29vZ2xl/AVvXsEiVmSotv2QzOwIoMaq4Wsdepw0e6b-smaHv2rEypal95hnhbEVsBOB6CYnI3IvzyVMMKXH4ErmHJEjM9Yno0tm4vcJ995NXFuDvkEWMJiiGGl4txy4FDE8yaXF3-4_YCIq5tEEsSuoVE6E/s800/emoticon-0106-crying.gif'/> :f
 
<img border='0' src='https://blogger.googleusercontent.com/img/b/R29vZ2xl/AVvXsEi2MKpixg48FaNJJdtudjcoMfUHeRYGD1n3-tKdsOvE423d4CnYdx9QDzn3QsjqbdNE2b-x9Xq1R3ZzHFqpsFmI4jS4JmB-FfCNjkAGgv1K7qR2qBpjdTwWEA8tf6htUTcqSUkjI1ucBy0/s800/emoticon-0109-kiss.gif'/> :g
 
<img border='0' src='https://blogger.googleusercontent.com/img/b/R29vZ2xl/AVvXsEjU1e-8KCruDlXaYVEspZgmRhtnzi22DJ_9-PcFX-QIP_JKedxaKeKza3H3WA60tIclN86szA5cQpDVaKQgfoSjWX-1coEEbhuB3EbKz1iNFzlucIYyI2jrJe0WnYugEucuUssZMoo-XjM/s800/emoticon-0111-blush.gif'/> :h
 
<img border='0' src='https://blogger.googleusercontent.com/img/b/R29vZ2xl/AVvXsEiqBwhw7fYy3IxXkhCSREuf3oVnTrhhVTOQVXm_wZFrI-oZ5r_tlKt5iwNFryXURBAlTqt4ZnjjVleLX_gGAORk70LH68AVaxiMelikeqoRiwrmxvk9_z8_RV-uMFzIADGYvHGOg0VKidg/s800/emoticon-0110-tongueout.gif'/> :i
 
<img border='0' src='https://blogger.googleusercontent.com/img/b/R29vZ2xl/AVvXsEh7ZlNhNhZhZIEqqKlrX8TzpBta2-wuhLnmMCTb7SOB6GL98qZZv4pUfyXpHaVtw_3ugpYuS8Iin1eAZfJc2jX5BTfubdJZQlGkNQ4Hc2mGP33kgeGjYD9NyiJYYrOA9tw4HkO5mhDbLho/s800/emoticon-0126-nerd.gif'/> :j
 
<img border='0' src='https://blogger.googleusercontent.com/img/b/R29vZ2xl/AVvXsEhM6Mr89RJriSxcejyNEvvFXS7XP8VAvyA8_5iDLb9y4LcbR5Xqnqc7uhB35rPQV_XIH4E2IcOjz3TGD7x_msuxY5OoofD6g74S46GRBHdGA0wPyvPYmvgFHMnHCYQDyM0lBAuwm4b6Ru0/s800/emoticon-0103-cool.gif'/> :k
 
<img border='0' src='https://blogger.googleusercontent.com/img/b/R29vZ2xl/AVvXsEiBmWV21Repy989t_-NSvcATniAVYsOf_gU-PqdS-ovLEtCxd9et0DfBEGvMQU_x-M9aUGFaVzJPlUBxyhSA4q0xPiEuWqMXVKKpLUq8w1lSl8jhNEJHc9kaUFzbSBL7h1Pq_VeL2E7ulA/s800/emoticon-0130-devil.gif'/> :l
 
<img border='0' src='https://blogger.googleusercontent.com/img/b/R29vZ2xl/AVvXsEjgzqcODwsR2nwaFFHPm3V0pXl6AXpEdid1NWZ13Uo2HKbvK7nLVtr90j_XlyqqwsQnACFHVOb6vS7n82-8DM75sUV1Uht3v3nscIRH1Y_YYi1pgu_d3GB4iBPJ6Bj62_qqXAKei-gx2Qc/s800/emoticon-0133-wait.gif'/> :m
 
<img border='0' src='https://blogger.googleusercontent.com/img/b/R29vZ2xl/AVvXsEiHl59Dl894dpOZQRxYIj19pTDQYE4sEBkfpZpjamq3t9-9EKQL9rPBXj1Gg_gYc2eHvGpKfp8KnqUP-u5-OKGbYTArCjJMrlopEYXiZb1__Qa0nqod6qSFkFROo9L2cj7KQOshe8wdDIE/s800/emoticon-0137-clapping.gif'/> :n
 
<img border='0' src='https://blogger.googleusercontent.com/img/b/R29vZ2xl/AVvXsEh-MXuXFTEuJLIrdc2whuINC7LjC9FDFya4d995Gl1AcxLSeAi3CMQivJdEB4KwqaIwH0owBw9Pbt92Vlk445cmD7hk2FjimF9gJX-fxckD4UeOWbs-INdOF2jORD7EUcxnrMFx1Cs_KUI/s800/emoticon-0136-giggle.gif'/> :o
 
<img border='0' src='https://blogger.googleusercontent.com/img/b/R29vZ2xl/AVvXsEgSlI-iMoYpSGdrR4X7-kJzU4FO5F6jxI1j6Puz6ajGiP9lnbvHrtJmB4HcB1S3qX9V4TLKB5S-dJMwCsyqGDowWYuVAd1LudWtvTZ4WilLJuTD6gEAKrVa_DkbV7h1DXDX_IbFpoC4mNs/s800/emoticon-0141-whew.gif'/> :p
 
<img border='0' src='https://blogger.googleusercontent.com/img/b/R29vZ2xl/AVvXsEjDHX39KsRxtotNOCa3qjhQYCZpywI4_SwWs5dcnzCcFgkicNzTKDLxPvQM-_IMChOE-ATODfIyb13KQRD8vCft8saHUlMenYg-jMNhDzmlNsshov1PlW0HCt8pZHCAg2uDJZZHrzRAb98/s800/emoticon-0148-yes.gif'/> :q
 
<img border='0' src='https://blogger.googleusercontent.com/img/b/R29vZ2xl/AVvXsEi9NgrJBBOKYDuTeIlq61lXnUYjxb63h_-v36sOWTv-aEbLVhxGzGbQ-SH38PdSu1FQ0RgfKUKmNnuBy5iYVxoC-0Oi5lWSBfI5kv0Kte1l75vo5kio8oIEgVcPDBCTEX09P0bi3_utQUc/s800/emoticon-0149-no.gif'/> :r
 
<img border='0' src='https://blogger.googleusercontent.com/img/b/R29vZ2xl/AVvXsEjsSCjcmD8im_SGzON6QHVWfkHTII4Cq-0EUWwhBIOVh6FpuzDg-BcpJ-xC0Kq1npjz-trkJF-H9NdWqmdY6rugS5BuQDSFdeMB8qrMB6yK9vhKLqljehKiNl8DIk6XOolWlcJ_fkvb1aI/s800/emoticon-0178-rock.gif'/> :s
 
<img border='0' src='https://blogger.googleusercontent.com/img/b/R29vZ2xl/AVvXsEh5u5B_Hzn3s_f9E7la1CVdNtxw3kjXirxzb8Xj4gYxhzx377W1MQ-dg4AWhU4Kn4vgbfs-jbYHXo8ff799Hzm75sGy0NESwrr9-C81KgNZ0kuM_XI-JE5ovHin9DM0cZ1eH2NzfpEII8I/s800/emoticon-0155-flower.gif'/> :t
</div>
- Now, Save the template. You are done, after this emoticons will be shown in reader's comment.
If you want to add Skype emoticons in Author's comments too then after saving this follow these steps:- Find </body> and just above this code write the following code:
<script type='text/javascript'>
//<![CDATA[
a = document.getElementById('comments');
if(a) {
b = a.getElementsByTagName("DD");
for(i=0; i < b.length; i++) {
if (b.item(i).getAttribute('CLASS') == 'Author-comment-body' , 'comment-body') {
_str = b.item(i).innerHTML.replace(/:j/gi, "<img src='https://blogger.googleusercontent.com/img/b/R29vZ2xl/AVvXsEh7ZlNhNhZhZIEqqKlrX8TzpBta2-wuhLnmMCTb7SOB6GL98qZZv4pUfyXpHaVtw_3ugpYuS8Iin1eAZfJc2jX5BTfubdJZQlGkNQ4Hc2mGP33kgeGjYD9NyiJYYrOA9tw4HkO5mhDbLho/s800/emoticon-0126-nerd.gif' alt='' class='smiley'/>");
_str = _str.replace(/:k/gi, "<img src='https://blogger.googleusercontent.com/img/b/R29vZ2xl/AVvXsEhM6Mr89RJriSxcejyNEvvFXS7XP8VAvyA8_5iDLb9y4LcbR5Xqnqc7uhB35rPQV_XIH4E2IcOjz3TGD7x_msuxY5OoofD6g74S46GRBHdGA0wPyvPYmvgFHMnHCYQDyM0lBAuwm4b6Ru0/s800/emoticon-0103-cool.gif' alt='' class='smiley'/>");
_str = _str.replace(/:l/gi, "<img src='https://blogger.googleusercontent.com/img/b/R29vZ2xl/AVvXsEiBmWV21Repy989t_-NSvcATniAVYsOf_gU-PqdS-ovLEtCxd9et0DfBEGvMQU_x-M9aUGFaVzJPlUBxyhSA4q0xPiEuWqMXVKKpLUq8w1lSl8jhNEJHc9kaUFzbSBL7h1Pq_VeL2E7ulA/s800/emoticon-0130-devil.gif' alt='' class='smiley'/>");
_str = _str.replace(/:m/gi, "<img src='https://blogger.googleusercontent.com/img/b/R29vZ2xl/AVvXsEjgzqcODwsR2nwaFFHPm3V0pXl6AXpEdid1NWZ13Uo2HKbvK7nLVtr90j_XlyqqwsQnACFHVOb6vS7n82-8DM75sUV1Uht3v3nscIRH1Y_YYi1pgu_d3GB4iBPJ6Bj62_qqXAKei-gx2Qc/s800/emoticon-0133-wait.gif' alt='' class='smiley'/>");
_str = _str.replace(/:n/gi, "<img src='https://blogger.googleusercontent.com/img/b/R29vZ2xl/AVvXsEiHl59Dl894dpOZQRxYIj19pTDQYE4sEBkfpZpjamq3t9-9EKQL9rPBXj1Gg_gYc2eHvGpKfp8KnqUP-u5-OKGbYTArCjJMrlopEYXiZb1__Qa0nqod6qSFkFROo9L2cj7KQOshe8wdDIE/s800/emoticon-0137-clapping.gif' alt='' class='smiley'/>");
_str = _str.replace(/:o/gi, "<img src='https://blogger.googleusercontent.com/img/b/R29vZ2xl/AVvXsEh-MXuXFTEuJLIrdc2whuINC7LjC9FDFya4d995Gl1AcxLSeAi3CMQivJdEB4KwqaIwH0owBw9Pbt92Vlk445cmD7hk2FjimF9gJX-fxckD4UeOWbs-INdOF2jORD7EUcxnrMFx1Cs_KUI/s800/emoticon-0136-giggle.gif' alt='' class='smiley'/>");
_str = _str.replace(/:p/gi, "<img src='https://blogger.googleusercontent.com/img/b/R29vZ2xl/AVvXsEgSlI-iMoYpSGdrR4X7-kJzU4FO5F6jxI1j6Puz6ajGiP9lnbvHrtJmB4HcB1S3qX9V4TLKB5S-dJMwCsyqGDowWYuVAd1LudWtvTZ4WilLJuTD6gEAKrVa_DkbV7h1DXDX_IbFpoC4mNs/s800/emoticon-0141-whew.gif' alt='' class='smiley'/>");
_str = _str.replace(/:q/gi, "<img src='https://blogger.googleusercontent.com/img/b/R29vZ2xl/AVvXsEjDHX39KsRxtotNOCa3qjhQYCZpywI4_SwWs5dcnzCcFgkicNzTKDLxPvQM-_IMChOE-ATODfIyb13KQRD8vCft8saHUlMenYg-jMNhDzmlNsshov1PlW0HCt8pZHCAg2uDJZZHrzRAb98/s800/emoticon-0148-yes.gif' alt='' class='smiley'/>");
_str = _str.replace(/:r/gi, "<img src='https://blogger.googleusercontent.com/img/b/R29vZ2xl/AVvXsEi9NgrJBBOKYDuTeIlq61lXnUYjxb63h_-v36sOWTv-aEbLVhxGzGbQ-SH38PdSu1FQ0RgfKUKmNnuBy5iYVxoC-0Oi5lWSBfI5kv0Kte1l75vo5kio8oIEgVcPDBCTEX09P0bi3_utQUc/s800/emoticon-0149-no.gif' alt='' class='smiley'/>");
_str = _str.replace(/:s/gi, "<img src='https://blogger.googleusercontent.com/img/b/R29vZ2xl/AVvXsEh5u5B_Hzn3s_f9E7la1CVdNtxw3kjXirxzb8Xj4gYxhzx377W1MQ-dg4AWhU4Kn4vgbfs-jbYHXo8ff799Hzm75sGy0NESwrr9-C81KgNZ0kuM_XI-JE5ovHin9DM0cZ1eH2NzfpEII8I/s800/emoticon-0155-flower.gif' alt='' class='smiley'/>");
_str = _str.replace(/:t/gi, "<img src='https://blogger.googleusercontent.com/img/b/R29vZ2xl/AVvXsEjsSCjcmD8im_SGzON6QHVWfkHTII4Cq-0EUWwhBIOVh6FpuzDg-BcpJ-xC0Kq1npjz-trkJF-H9NdWqmdY6rugS5BuQDSFdeMB8qrMB6yK9vhKLqljehKiNl8DIk6XOolWlcJ_fkvb1aI/s800/emoticon-0178-rock.gif' alt='' class='smiley'/>");
_str = _str.replace(/:a/gi, "<img src='https://blogger.googleusercontent.com/img/b/R29vZ2xl/AVvXsEhQLZZRevG_Sji2zgO5K2IrC4mJrWwrRxBES2mQgbZt4TEzpDjcHpkf7Pb32yYgKx-BhynInmxZkoYDN-B7UDVohXYKbetduvRvpUOtx1bl0YqnHskjezxMWLzmOYIYvS7TTXExyAV4JvM/s800/emoticon-0100-smile.gif' alt='' class='smiley'/>");
_str = _str.replace(/:b/gi, "<img src='https://blogger.googleusercontent.com/img/b/R29vZ2xl/AVvXsEg90F1zaum5Qv38MH9fwWqXgyjUfjbtPgXDCoPoUgw-mh8i8ChBUTYU5nc79QaywTzRqLBHJPUvaIPlK4Ra30rOIsLLV_Mbr9jxKIvI0kunKTnVQD6keiywDh6pzAmIAT_8kDBhKMFFDX4/s800/emoticon-0101-sadsmile.gif' alt='' class='smiley'/>");
_str = _str.replace(/:c/gi, "<img src='https://blogger.googleusercontent.com/img/b/R29vZ2xl/AVvXsEhKOWywUENEDL5YQkxC8ItFfdQNDxh_RTkYN1T6wQzFPCVjqZ3NdFUZJRbHgcsDYysnNGkmWh1aIqaoZ_MMCILnIO9uxidiATFEn2yTRBNsIAzlr-zoC74-GAht4whsiI-ZOFwRUr_m_5Q/s800/emoticon-0102-bigsmile.gif' alt='' class='smiley'/>");
_str = _str.replace(/:d/gi, "<img src='https://blogger.googleusercontent.com/img/b/R29vZ2xl/AVvXsEgk9_22pZpyV4oYDXwnjVcoww5pWhQI-uFYReTjROY5lGr3FI_zXNAoX0lG0tCwH_8_NV_tOpsg9CKBh6mFdJgFAtc2CKp9D5u0FICHMFZscmK08JDlUvwypwp7inSCXKudBpaGh44ff_4/s800/emoticon-0105-wink.gif' alt='' class='smiley'/>");
_str = _str.replace(/:e/gi, "<img src='https://blogger.googleusercontent.com/img/b/R29vZ2xl/AVvXsEhodPCb68NBhL1fs_nGb45AP7jY5r7EN6GC-pZwJcPLf-KQI7b3Ii-V7PJJOtNw0CPn5vkPWtxumMDc7UOkwattxQt6juer_V5RI3AJ_tF7zD9KND7gsSYch6IouX_j9MYoH4pMkkQZ9oQ/s800/emoticon-0104-surprised.gif' alt='' class='smiley'/>");
_str = _str.replace(/:f/gi, "<img src='https://blogger.googleusercontent.com/img/b/R29vZ2xl/AVvXsEiVmSotv2QzOwIoMaq4Wsdepw0e6b-smaHv2rEypal95hnhbEVsBOB6CYnI3IvzyVMMKXH4ErmHJEjM9Yno0tm4vcJ995NXFuDvkEWMJiiGGl4txy4FDE8yaXF3-4_YCIq5tEEsSuoVE6E/s800/emoticon-0106-crying.gif' alt='' class='smiley'/>");
_str = _str.replace(/:g/gi, "<img src='https://blogger.googleusercontent.com/img/b/R29vZ2xl/AVvXsEi2MKpixg48FaNJJdtudjcoMfUHeRYGD1n3-tKdsOvE423d4CnYdx9QDzn3QsjqbdNE2b-x9Xq1R3ZzHFqpsFmI4jS4JmB-FfCNjkAGgv1K7qR2qBpjdTwWEA8tf6htUTcqSUkjI1ucBy0/s800/emoticon-0109-kiss.gif' alt='' class='smiley'/>");
_str = _str.replace(/:h/gi, "<img src='https://blogger.googleusercontent.com/img/b/R29vZ2xl/AVvXsEjU1e-8KCruDlXaYVEspZgmRhtnzi22DJ_9-PcFX-QIP_JKedxaKeKza3H3WA60tIclN86szA5cQpDVaKQgfoSjWX-1coEEbhuB3EbKz1iNFzlucIYyI2jrJe0WnYugEucuUssZMoo-XjM/s800/emoticon-0111-blush.gif' alt='' class='smiley'/>");
_str = _str.replace(/:i/ig,"<img src='https://blogger.googleusercontent.com/img/b/R29vZ2xl/AVvXsEiqBwhw7fYy3IxXkhCSREuf3oVnTrhhVTOQVXm_wZFrI-oZ5r_tlKt5iwNFryXURBAlTqt4ZnjjVleLX_gGAORk70LH68AVaxiMelikeqoRiwrmxvk9_z8_RV-uMFzIADGYvHGOg0VKidg/s800/emoticon-0110-tongueout.gif' alt='' class='smiley'/>")
b.item(i).innerHTML = _str;
}
}
}
//]]>
</script>
- Now save your template and see the new and nice change. Skype emoticons will be shown in both reader's and author's comments.
Saturday, 16 March 2013
How to Add Facebook Like Button in Blogger Under the Post Titles

This is another tip to increase your site traffic. When you'll add this Facebook button below the post title and somebody likes your post then it will be shared to his friends and you site will be know his friends too and when his friends likes your any post then it will be shared to their friends and so on. They will visit your blog site daily after that and your site will be familiar soon and definitely your page views will increase.
I'll tell you now that how can you add the Facebook like button under you post.
Here is the procedure:
- Go to you blogger 'Dashboard', then 'Template' and finally 'Edit HTML'.
- Then check 'Edit Widget Templates' option.
- Now search this code with 'CTRL+F'
<data:post.body/>
- Now, just above this code write the following code:
<p><iframe allowTransparency='true' expr:src='"http://www.facebook.com/plugins/like.php?href=" + data:post.url + "&layout=button_count&show_faces=false&width=100& action=like&font=arial&colorscheme=light"' frameborder='0' scrolling='no' style='border:none; overflow:hidden; width:100px; height:20px;'/></p>
- Finally, save your template and check it.
How to Delete Threaded Comments in Blogger

There are two levels of comments, Single level and two levels commenting. Single level commenting allow a reader to write a comment on the post and two levels commenting is the original comment and replies to that comment. Blogger is supporting two levels commenting.
Threaded comments allow a reader to reply another reader on the post.
You can avoid this feature and delete the threaded comments, today I'll tell you how?
Here is the procedure to avoid this feature:
- Firstly, you have to go to your blogger 'Dashboard', then 'Template' and finally 'Edit HTML'.
- Now check the 'Expand Widget Templates' option on the top of the page.
- Now Search the following code with 'CTRL+F'
<b:if cond='data:post.showThreadedComments'>
<b:if cond='data:post.showThreadedComments'>
<b:include data='post' name='threaded_comments'/>
<b:else/>
<b:include data='post' name='comments'/>
</b:if>
</b:if>
<b:if cond='data:blog.pageType == "item"'>
<b:if cond='data:post.showThreadedComments'>
<b:include data='post' name='threaded_comments'/>
<b:else/>
<b:include data='post' name='comments'/>
</b:if>
</b:if>
- You'll find this code twice, you have to remove this code twice and replace it twice with following code:
<b:include data='post' name='comments'/>
</b:if>
<b:if cond='data:blog.pageType == "item"'>
<b:include data='post' name='comments'/>
</b:if>
- Now, Save your template and you'll see that there is no threaded comments.
Wednesday, 13 March 2013
How to Add First Big Letter (Drop Cap Letter) in Blogger

Today I'll tell you the way that how can you add or create first big letter in your each post. Sometimes it looks very beautiful as show in the picture that the very first letter of the post is larger than other words. This is also called 'Drop Cap Letter'. The drop cap letter can have different colour and font size than rest of the words of post. Drop cap letter can also be shown in comments.
Now let's start it. Before doing this you have to get and save the backup.
- First of all go to your blogger 'Dashboard' then in 'Template' , 'Edit HTML' then you have HTML file then on the top of file you'll have the option 'Expand Widget Template', check this option.
- Now search the following code with CTRL+F:
]]></b:skin>
- Add the following code, just above mentioned code:
.capital:first-letter {
float: left;
display: block;
font-family: Times, serif, Georgia;
font-size: 40px;
color: #000000;
margin:0px 5px 0 0;
padding:0 0 0 10px;
}
In this code 40px is Size of letter you can decrease or increase it according to you desire and
#000000 is Value of color you also set it with your desired colour value.
- After adding above code, search the following code:
<data:post.body/>
- Then before and after the above code write the following code (in colour) like this:
<div class='capital'><data:post.body/></div>
- Finally, save your template.
I hope above mentioned code (<div class='capital'><data:post.body/></div>) will work for you, In case of not working this code you can check one of these code:
<p class="capital"><data:post.body/></p>
OR
<span class="capital"><data:post.body/></span>
Then save template and I am sure it will work for you. Apply this in you blog and enjoy it.
Monday, 11 March 2013
How to Add Related Post Gadget with Thumbnail in Blogger
 The related posts are those post which will come beneath of the post and these are posts which are related to that post. Most likely related posts are shown in form of 'You may also like this' or 'You might also like these posts'. This is a very good way to keep your visitor busy with your blogger site to display the related posts on your site. If the related posts are with thumbnail then it attracts the user or visitor around the site and it is very smart thinking. The related posts are chosen from the same category, label or tag. Here is the procedure to show the related post gadget with thumbnail for bloggers.
These are the steps to add this gadget.
- First of all you have to log in within your blogger site and then go to LinkWithin site (or you can click here on LinkWithin), after that you'll get a page, on that page your concern part is following:
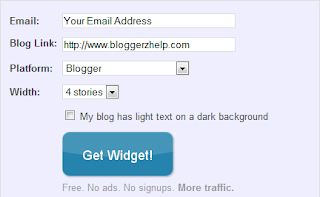
As shown in this part, you have to write your email address which is attached with your blogger and write down your blog link, in 'Platform' you have to choose Blogger, the last one is 'Width' option and in this option you can choose the number of related posts according to your space which will be shown after add this gadget. Finally, click on 'Get Widget'.
- After click on 'Get Widget' you'll have this option:
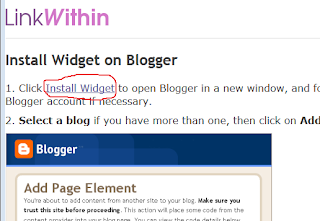
In this part you have to click on 'install widget' option as marked in above portion.
- When you'll click on 'install widget' then you'll have the page like this:
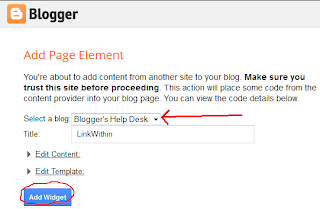
In this part you have to select the blog if you have more than one blog, if you are logged in already in your desired blog then you'll see your blog name automatically. After this, write the 'Title' which is LinkWithin. Now, click on 'Add Widget'.
- After click on 'Add Widget', this gadget will automatically add in your blogger site with the name 'LinkWithin' and you'll get your blogger 'Layout' page. On that page this gadget in somewhere on your blog, most probably on the top of your blog, find 'LinkWithin', drag it to the bottom of 'Blog Posts' and drop it like this:
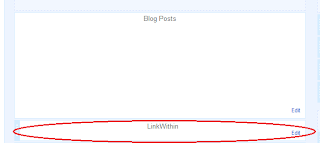
- After doing the above step finally you have have to save this arrangement in your blog:
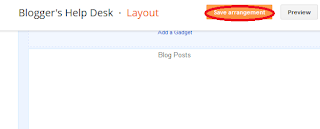
You'll find this option on the top. Click on it and save it. This saved settings will be applied
Now, check your blog and you can see the related posts with thumbnail under each post.
Saturday, 9 March 2013
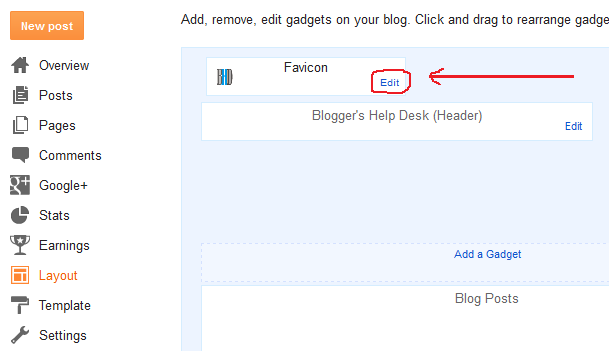
How to Add Favicon In Blogger Blog
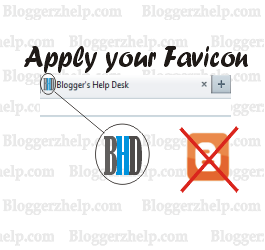 Favicon appears on the title bar of a web page. Usually, each website has its own favicon which is related to their header logo. In blogger, whenever you create new blog then you can see the blogger default logo as favicon on the title bar of the page. You can change this manually by following some simple steps.
Before applying your own favicon, you must keep some things in mind.
- Your favicon must be a size of 32x32 px.
- It is recommended that the format should be .png.
- Always use minimum words so that it can be easily viewable on the title bar.
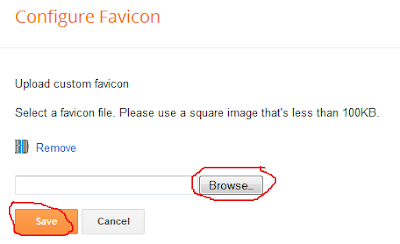
Browse your favicon of 32x32 px and click on Save.
Now check your webpage.
Alternative Method
If you are unable to see your favicon on the title bar then you have to use this method, then you can easily see your own favicon on the title bar of your blog.Go to blogger Dashboard > Template
Click on "Edit HTML" and search the following:
<b:skin>< Related posts
gadget is very important for a blog to engage users within the blog.
This gadget is also famous with the name "You Might Also Like". This
gadget is placed just below the each post so that when a user ends the
post, he could find some posts for his interest. This gadget is very
helpful to decrease the bounce rate of your blog.
Related posts
gadget is very important for a blog to engage users within the blog.
This gadget is also famous with the name "You Might Also Like". This
gadget is placed just below the each post so that when a user ends the
post, he could find some posts for his interest. This gadget is very
helpful to decrease the bounce rate of your blog.
Normally,
this gadget shows the all posts that are related to the above post. You
can set the number of post links in this gadget accordingly.
The implementation of this gadget is very simple and easy, you can try this.
Do the following instruction to apply this gadget.
- Go to your blogger dashboard and select "Templates" from "More Options"
- Now Download full template from "Backup/Restore" and click on "Edit HTML"
- Make check mark on "Expand Widget Templates" and search the following by pressing "ctrl+F"
</head>
Above this tag paste the following code:
<style>
#related-postz { float: left; width: 100%; margin-top: 20px; margin-bottom: 20px; margin-left: 5px; line-height: 20px; font-weight: bold; font: 18px Arial,sans-serif; margin-bottom: 10px; }
#related-postz .widget { list-style-type : none; margin : 5px 0 5px 0; padding : 0; }
#related-postz .widget h2, #related-posts h2 {
font-size: 1.2em;
font-weight: bold;
color: black;
font-family: Georgia, “Times New Roman”, Times, serif;
margin-bottom: 0.75em;
margin-top: 0em;
padding-top: 0em; }
#related-postz a { text-decoration : none; }
#related-postz a:hover { text-decoration : underline; }
#related-postz ul { border : medium none; margin : 10px; padding : 0; }
#related-postz ul li {
display : block;
background : url("http://images.bloggerzhelp.com/Bloggerzhelp/favicon%20bloggerzhelp%20copy.png") no-repeat 0 0;
padding-left : 21px;
padding-bottom : 1px;
margin-bottom : 5px;
line-height : 2em;
border-bottom:1px dotted #cccccc;
font-size: 1.2em;
font-weight: bold;
color: black;
font-family: Georgia, “Times New Roman”, Times, serif;
margin-bottom: 0.75em;
} </style>
<script src='http://blogfilez.googlecode.com/files/related.js' type='text/javascript'/>
- You can change the font size from 1.2em to accordingly in both locations font-size: 1.2em;.
Now search for this tag:
<div class='post-footer'>
And just above this paste the following code:
<b:if cond='data:blog.pageType == "item"'>
<div id='related-postz'>
<font face='Verdana' size='4'><b>You Might Also Like:</b></font>
<b:loop values='data:post.labels' var='label'><b:if cond='data:blog.pageType == "item"'>
<script expr:src='"/feeds/posts/default/-/" + data:label.name + "?alt=json-in-script&callback=related_results_labels&max-results=2"' type='text/javascript'/></b:if></b:loop>
<script type='text/javascript'> removeRelatedDuplicates(); printRelatedLabels();
</script><div align='right' style='font-size:11px'><a href='http://bloggerzhelp.com'>Widgets for blogger</a></div></div>
</b:if>
- You can change the Title according to your choice (e.g. Related Posts) instead of You Might Also Like:
- Change the number of post links from results=2
Hope so you will like this. Feel free to comment below or contact us if any problem. Best Wishes :)
Tuesday, 29 January 2013
How to Add Image Background to Your Blogger Blog
 The background of a blog increases the attraction of a blog. It also effects the eyes of the audience, so we should select an eyesight friendly background. There are many types of backgrounds that you can choose as your blog background such as simple color selection, images and etc.
To select a simple color background, you have to add color code and if you want to add image then you must prepare an image. You can also select an image of texture to increase the attraction of your blog. For plane texture, you can create image any size and then apply "repeat" function in the script but if you want to add some picture or scenery then you have to prepare a full size image.
To apply image background follow this procedure:
- Go to blogger dashboard and select "Template" from options.
- Click on "Edit HTML" and search this:
</head>
Now just above this paste the following code.
<style type='text/css'>
body
{
background-image:
url("IMAGE URL");
background-repeat:
repeat;
background-attachment:
fixed
}
<!-- Coding by www.bloggerzhelp.com -->
</style>
- Before applying, add your desired image URL instead of IMAGE URL
- If you have picture of scenery then add no-repeat instead of repeat
Sunday, 13 January 2013
Add Meta Description and Keywords Tag in Blogger
 Meta Tags are very important for a blog because they are keys to get visitor into your blog/website. When users search for something then search engine also catches the meta tags of the site. Meta tags usually consist of "Meta Description" and "Meta Keywords". There are some other meta tags also such as Author info but these two are very important for a blog or website because the description is displayed below the site title in search engine and keywords are easily caught by search engine while a user types it on Google, Yahoo, Bing or any other search engine.
Lets take some example to understand it well. You are a common user of internet and go to google.com to search something. then you type bloggerzhelp.com then you can see the meta description below the title of blog as showing in image below.
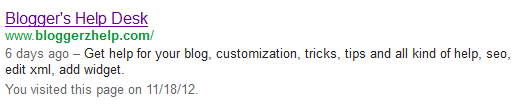
This type of description let the visitor to know about your blog or website and then they take a step forward to your site. Although the meta keywords are not displaying in the search result but those are caught by search engine when a visitor type a specific word or combination of keywords. (Remember that the availability of your blog link on search engine page depends upon the rank of your site.)
Now if you want to add some meta description and meta keywords to your site, then do the following process.
Go to your blogger dashboard and select "Template"
Now click on "Edit HTML" and check that any meta line available below <head>
If no then add these rows below your <head> tag.
<meta content='Type Description for your blog here' name='description'/>And if you like to add author meta tag then add the following code too below <head>
<meta content='Relevant Keywords separate by commas here' name='keywords'/>
<meta content='Muhammad Faheem Usama' name='author'/>
- Change all yellow highlighted spaces with your own once accordingly before applying it to your blog.
That's all, and if there are already some meta rows then check it and fill the empty space with description and keywords because in some blogger templates, these meta tags are added and the content fields kept empty.
Wednesday, 2 January 2013
How to Unlock A Locked Gadget to Remove It From Blogger
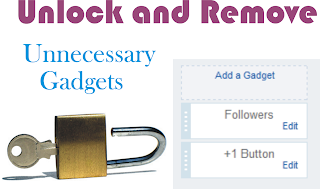
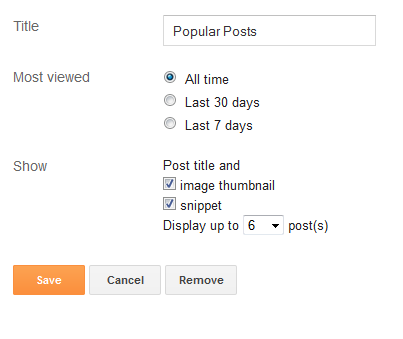
Sometimes, when you add a new blogger template for you blog, you see that there are some unnecessary gadgets. You want to remove them and when you go to edit and try to remove, you find that there is no remove button. So you worries. But now I will tell you how you can remove that gadget. When you go to your blogger's layout you see the gadget which you want to remove but there is no remove button. This type of gadgets are called Locked Gadgets. Here is the difference between Locked and Unlocked Gadgets in the snapshot.
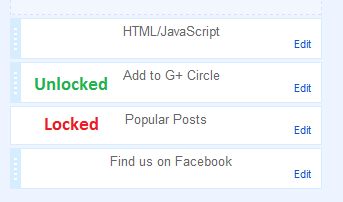
You can detect the locked gadget through left corner of gadget as mention in picture. The "Popular Posts" gadget is locked. There is very easy way to unlock it. When you unlock it, the "Remove" button will appear.
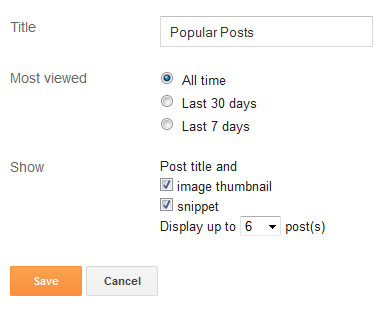
- Go to "Template" and then click "Edit HTML"
- Check on "Expand Widgets Templates" and Press "Ctrl+F"
- Type the Gadget Name "Popular Posts"
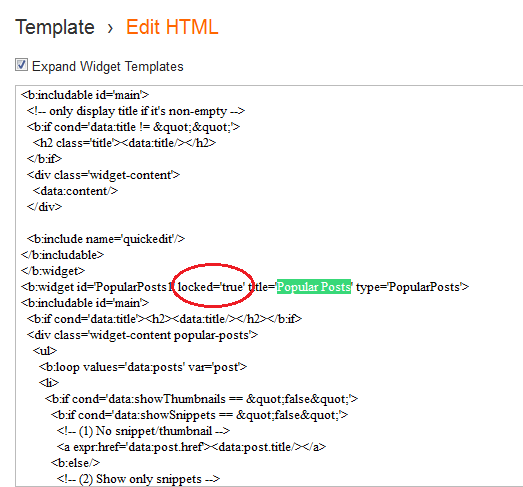
You will see the locked value as 'true'. Changed it 'false' and save the template. Now you can see the remove button and can easily delete the gadget.
Best Wishes.
Thursday, 22 November 2012
Recent Posts of Feedburner Gadget for Blogger
You have seen Recent Posts Gadget on many blogs or website. The benefit of this gadget is that the users those do not reach your site directly home page can see the latest posts of your blog/site. Because mostly users reach to your site on a specific single post from search engine. So recent posts are very important for a blog/website to engage the user within your site to decrease your bounce rate. There are two types of feeds. First is default blogger feeds and other one is feedburner feeds. I will tell today both methods of feeds to add on your blog.
Default feeds is quite easy for everyone. For this you do not need to Sign Up to feedburner account.

Add Default Feeds for Recent Posts
To add default feeds for Recent Posts, please do follow the steps.1- Go to your blogger Dashboard
2- Select "Settings" and then "Other"
3- Now add your feeds default URL in the box "Post Feed Redirect URL" with change your own blog address.
- e.g. http://www.bloggerzhelp.com/feeds/posts/default

4- Now Select "Layout" and Click "Add a Gadget"

5- Select "Feed" Option

6- Add your Feed Default URL

7- Click Continue and then add "Recent Posts" in Title, Number of Feeds and "Save"

- If you want to add more than 5 posts then Sign Up to feedburner.com and after getting your feedburner URL do the following process.
Add Feedburner Feeds with More than 5 Items
1- Add your redirect feedburner address to your blogger setting

2- Login to your feedburner account and select number of item display of your choice.
3- Choose "Open links in Same Window"
4- Uncheck all options
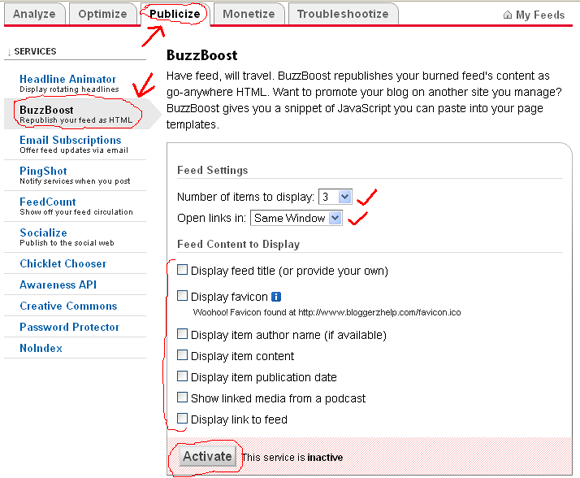
5- Click "Activate" and your will see this.

6- Select Use as a widget in "Blogger", Copy the Code and click on Go! button.
7- Go to your blogger "Layout" and Click on "Add a Gadget"
8- Select "HTML/JavaScript" Option

9- Title as "Recent Posts", paste your code and select "Save"

- If you like this, share with friends.
Wednesday, 21 November 2012
Floating Back to Top Button for Blogger
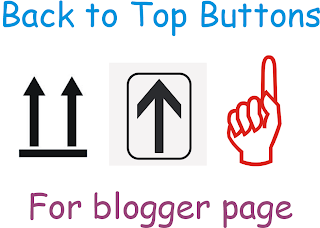
You have seen back to top buttons on many blogs and also may like this style. Some bloggers may also want to add this type of button for their blog. This button not only increase the attraction but also provide ease for the users to go back to the top of the page.
Why Back to Top Button Require?
Back to Top button is used for the blogs those have a lot of post on their Home page or they have very lengthy posts on their blog. So when a user start reading the and scrolling down until the end of post and if he wants to go top to the Menu Bar of the blog then scrolling back to the top is time taking process, so if there is a Back to Top button on the blog then it is just single click method to go back to the top.
Here is the code for Two type of buttons, the both are merged and displayed with the mouse over the button. Follow the steps.
- Go to blogger Deshboard
- Select Layout and then click "Add a Gadget"
- Click on HTML/JavaScript option
- Now paste the following Code.
<a style="display:scroll;position:fixed;bottom:5px;right:5px;" href="#" title="Back to Top"><img onmouseover="this.src='URL Of Your Larger Button Image'" src="URL Of Your Smaller Button Image" onmouseout="this.src='URL Of Your Smaller Button Image'"/></a>
This is combination of two buttons, large and small to show difference when you take mouse pointer to the button.
Note: You can add image in new post by adding image and get the link from HTML editor and keep this post in draft.
Monday, 19 November 2012
Customize Image Bullet List Style for Blogger Posts
 When we are writing blogger post then we, sometimes, have some points in the post for which we use bullets. Applying bullets make these points different from other contents. If you want to show these bullets more stylish and attractive then use the following method. It is very simple and easy.
- Go to Blogger Dashboard and Select Template

- Now Click on Customize option

- Now Click On Advanced and paste the following css code and then clic on Apply to Blog

.post ul li {
line-height: 1.4em;
background: transparent url(https://blogger.googleusercontent.com/img/b/R29vZ2xl/AVvXsEjnq4b6Rl9dxDhx43uZIKaZbSsVhsQekN5hvv9B6vesMxIJyV7iy_QCb8bhk44w2oaJI8fwW0_MKtPIbO2vvI5tHx2V830KzuqZYM4cs8ZXuJWVCZ0Lzw0H4qRo1pO8ytUPV5-ZWAGZdJAh/s1600/1.png) no-repeat scroll 0px 4px;
margin: 0.3em 0;
padding: 0 0 0.8em 20px;
}
.post ul li:hover {
background: transparent url(https://blogger.googleusercontent.com/img/b/R29vZ2xl/AVvXsEiAX7BHDJR-GvKR-tXiv5e_yMaGP9JrfmOKSDjrCLdA0ANBR8hbRSxCXjzCh4zEgOolltRKHe2WJFcGRshc3Z_VoHi0OFiSGDpg41LAW4hky-PDGu2G4b9zmGXyNG5JxpzbxUyPgY2aArce/s1600/2.png) no-repeat scroll 0px 4px;
}
- Blue and Green URL are for bullets, you can make your own bullets with size 9x9 pixels.
Saturday, 10 November 2012
Enable/Show Profile Picture with Blogger Comments
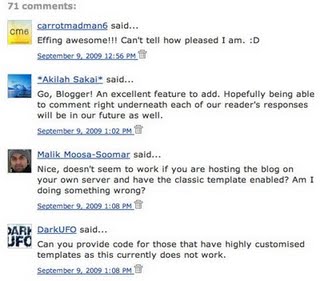
If your blog does not display profile picture with comments, then do not worry. Today I am telling you that how you can enable Profile Picture along with the comments. Follow the procedure.
1- Login to you blogger dashboard
2- Click "More Option" against your required blog name (just before "View Blog" option)
3- Select "Template" and Backup/Restore your Template.
3- Select "Template" and Backup/Restore your Template.
4- Click "Edit HTML" and then Select Proceed and check Expand Widget Templates.
5- Press Ctrl+F and search the following code.
<dl id='comments-block'>
Replace the above code with the following.
<dl expr:class='data:post.avatarIndentClass' id='comments-block'>
6- Now Search this one.
<a expr:name='data:comment.anchorName'/>
Just above/before it paste this coding.
<b:if cond='data:comment.favicon'>7- Save your template and now check your comments. Problem solved. :-)
<img expr:src='data:comment.favicon' height='35px' style='margin-bottom:-2px;' width='35px'/>
</b:if>
<a expr:name='data:comment.anchorName'/>
<b:if cond='data:blog.enabledCommentProfileImages'>
<data:comment.authorAvatarImage/>
</b:if>
Subscribe to:
Posts
(
Atom
)


