

Thursday, 11 April 2013
How to Apply Read More Option to All Posts Automatically in Blogger

You have noticed that almost every blog has Read More button on the posts which are displaying on home page. These posts have excerpt function to make the posts short on the home page for wider coverage of posts.
In blogger, there is no excerpt function for posts by default. That's why, a simple blogger template always displays full post. Because of full length post on home page, the length of the page has been increased or the home page covers only 2 or 3 posts maximum. Some custom blogger templates has the excerpt function for the posts.
If you will apply this function then home page can cover more posts with equal size and space. Another benefit of this function is that it causes to increase the charm and beauty of your blog layout.
If you are using a template which does not have the read more function, then you can easily apply this function for your current template. Simply follow the steps:
1- Go to blogger dashboard and choose "Template" and then click on "Edit HTML"
2- Press "Ctrl+F" and use Template Editor search area for searching </head> and press Enter
(Note: Click on the template code area and then press "Ctrl+F")

Now Just above the </head> tag, paste the following code.
<script type='text/javascript'>
summary_noimg = 250;
summary_img = 200;
img_thumb_height = 150;
img_thumb_width = 150;
</script>
<script type='text/javascript'>
//<![CDATA[
function removeHtmlTag(strx,chop){
if(strx.indexOf("<")!=-1)
{
var s = strx.split("<");
for(var i=0;i<s.length;i++){
if(s[i].indexOf(">")!=-1){
s[i] = s[i].substring(s[i].indexOf(">")+1,s[i].length);
}
}
strx = s.join("");
}
chop = (chop < strx.length-1) ? chop : strx.length-2;
while(strx.charAt(chop-1)!=' ' && strx.indexOf(' ',chop)!=-1) chop++;
strx = strx.substring(0,chop-1);
return strx+'...';
}
function createSummaryAndThumb(pID){
var div = document.getElementById(pID);
var imgtag = "";
var img = div.getElementsByTagName("img");
var summ = summary_noimg;
if(img.length>=1) {
imgtag = '<span style="float:left; padding:0px 10px 5px 0px;"><img src="'+img[0].src+'" width="'+img_thumb_width+'px" height="'+img_thumb_height+'px"/></span>';
summ = summary_img;
}
var summary = imgtag + '<div>' + removeHtmlTag(div.innerHTML,summ) + '</div>';
div.innerHTML = summary;
}
//]]>
</script>
Now Search for <data:post.body/> and replace it with the following code:
<b:if cond='data:blog.pageType != "static_page"'>
<b:if cond='data:blog.pageType != "item"'>
<div expr:id='"summary" + data:post.id'><data:post.body/></div>
<script type='text/javascript'>createSummaryAndThumb("summary<data:post.id/>");</script>
</b:if>
</b:if>
<b:if cond='data:blog.pageType == "item"'><data:post.body/></b:if>
<b:if cond='data:blog.pageType == "static_page"'><data:post.body/></b:if>
<b:if cond='data:blog.pageType != "static_page"'>
<b:if cond='data:blog.pageType != "item"'>
<div style='float:right;margin-right:10px;margin-top:5px;'>
<a expr:href='data:post.url'>Read More</a>
</div>
</b:if>
</b:if>
Now "Save template" and check the work.
Important Notes:
You can change the thumbnail size and number of character before Read More option of your choice.
summary_noimg = Increase the characters if your post have no image.
summary_img = These characters are apply on posts with images
img_thumb_height = This will apply for the height of your post thumbnail on home page
img_thumb_width = This option will work for the width of your post's image on home page.
Wednesday, 10 April 2013
How to Work With New Blogger Template HTML Editor

Blogger has recently changed the HTML editor. Now if you open your Template setting and click on the Edit HTML, you will find a completely changed layout. Blogger HTML Editor has been changed having some new extra features and functions. This new editor reduces the blogger's over work and problems which some of bloggers have been facing in old editor.
This new editor has the functions like Jump to Widget, Preview template, Revert changes, Revert widget templates to default and format template. Lets discuss all of them briefly so that you can work easily and without hesitation with this new editor.
Jump to Widget:
This function will take you to the selected widget area within the template code. This function will show your all widgets which are currently using within your template.
Preview Template:
You can preview your template after applying some new features or changing. The preview will appear on the same page instead of html code.
Revert changes:
You can easily revert the change which you have applied to your template. Remember that do not save your template. Use preview template function to check the apply changes. If you save the template, you can not revert.
Format Template:
This function will arrange your template code in proper way and clean up the indentation of the template. You must apply this instantly without hesitation.
Benefit of the new Editor over older one:
Following are the benefit/function which are useful in new editor:
Line Numbering:
This will helpful to go to the line which have some error.
No Need to Expand Widget Template:
Unlike older editor, there is no need to expand the widget template, so this function has been obsolete.
Save Change Affection:
In older editor, if you applied save change, then the editor took you to the top of the editor. But in new editor, you will stay at the save line in the editor where you were before the saving.
Tuesday, 2 April 2013
Use Alt Attribute for Better SEO and to Increase Blogger Traffic

As all of you know about SEO (Search engine Optimization). If your blogger or site has better SEO then your page views or traffic will increase. Most of the people don't know that with the help of images, SEO could have been better. Now I'll tell you the way that how can you optimize your images and blogger traffic?
When a picture is downloaded from internet then it is saved with its by default name. Your first step is that you have to change its name with proper keyword or image description.
There is a great percentage of blogger traffic depends upon the image search. Google image search is used worldwide for original and quality images. So, when you put the image name
with keyword then it will come in image search and as well as in surfing with those keywords. Your blogger posts are also searching by your post titles and bold letters in posts will also help to search that post.
Now, follow these steps to use alt attribute properly.
Change Image Name with Proper keyword:
When you are downloading the pictures then these will be saved with their by default name. Change the names of images with proper keyword before uploading or inserting in blogger. For example if a picture is downloaded with name of 1, then you have to change it with your proper description according to the content before uploading.
Use Alt Attribute:
An image is useless and meaningless when it is not tagged with keywords. For robots search an image should be proper tagged. Because spider search and search robots can't read the multimedia without untagged images. So. proper tagged images will help the robots search to search a proper topic. For this purpose use alt attribute. After you upload the picture go to the 'HTML' portion which is along with Compose option. There you can see the by default code which is following:
<div class="separator" style="clear: both; text-align: center;">
<a href="https://blogger.googleusercontent.com/img/b/R29vZ2xl/AVvXsEgMHD_95MmUGRln6h_uNFH3cemSUaewNKO8S3OXmK_nLK2ryK6-DZbevbJ7RPVIIbivRpdnPbstnBBW8uHcvFBWBZ5Gn7kx7DR-ydvsn5g_dNYQU4YmpHX9qk7ACTtAYt9rtEof08LIKbhD/s1600/how+to+seo+optimize+blogger+posts+titles.jpg" imageanchor="1" style="clear: left; float: left; margin-bottom: 1em; margin-right: 1em;"><img border="0" height="265" src="https://blogger.googleusercontent.com/img/b/R29vZ2xl/AVvXsEgMHD_95MmUGRln6h_uNFH3cemSUaewNKO8S3OXmK_nLK2ryK6-DZbevbJ7RPVIIbivRpdnPbstnBBW8uHcvFBWBZ5Gn7kx7DR-ydvsn5g_dNYQU4YmpHX9qk7ACTtAYt9rtEof08LIKbhD/s200/use+alt+attribute+for+better+SEO.jpg" width="250" /></a></div>
Now, find the image code started with 'img' which is in purple color, just after this add the alt attribute and write your image description (proper keyword name of image) which is in red color like this:
<div class="separator" style="clear: both; text-align: center;">
<a href="https://blogger.googleusercontent.com/img/b/R29vZ2xl/AVvXsEgMHD_95MmUGRln6h_uNFH3cemSUaewNKO8S3OXmK_nLK2ryK6-DZbevbJ7RPVIIbivRpdnPbstnBBW8uHcvFBWBZ5Gn7kx7DR-ydvsn5g_dNYQU4YmpHX9qk7ACTtAYt9rtEof08LIKbhD/s1600/how+to+seo+optimize+blogger+posts+titles.jpg" imageanchor="1" style="clear: left; float: left; margin-bottom: 1em; margin-right: 1em;"><img alt="image description" border="0" height="104" src="https://blogger.googleusercontent.com/img/b/R29vZ2xl/AVvXsEgMHD_95MmUGRln6h_uNFH3cemSUaewNKO8S3OXmK_nLK2ryK6-DZbevbJ7RPVIIbivRpdnPbstnBBW8uHcvFBWBZ5Gn7kx7DR-ydvsn5g_dNYQU4YmpHX9qk7ACTtAYt9rtEof08LIKbhD/s200/use+alt+attribute+for +better+SEO.jpg" width="100" /></a></div>
Replace "image description" with your proper keyword name that was given by you after downloading according to the content. Try to use maximum 5 or less words.
Use this attribute and enjoy. This will definitely help you for better SEO and increase your blogger traffic.
How to Transfer Blog from Blogger to Wordpress without Changing Posts Links

Worpress users are increasing day by day because of its easy and user friendly interface. Another reason is that, it is providing platform for those who have hosting account and want to run their blog as self hosted blog. If you are running your blog on blogger and want to transfer it to the wordpress with self hosting, then it is very easy. You must have your top level domain to transfer it because usual blogs always given the sub-domain of the respective blog like example.blogspot.com and example.wordpress.com. To keep the same url on wordpress, your blog on blogger must have top level domain.
Lets explain with example. If you do not have your own domain then your post link will be:
Lets explain with example. If you do not have your own domain then your post link will be:
http://example.blogspot.com/2013/04/post-title-words.html
In case, you transfer your blog to wordpress then the link will be:
http://example.wordpress.com/2013/04/post-title-words/
Now there are two problems with the links:
1- Top Level domains are different, which will cause as change of link (blogspot.com and wordpress.com)
2- Blogger link has .html extension while wordpress does not have any extension by default
The second problem can be solved if you are using your own top level domain.
So to start shifting your blog from blogger to wordpress, firstly export your blog from blogger settings.
After completion of export, do the following procedure.
1- Set your permalink in wordpress settings:
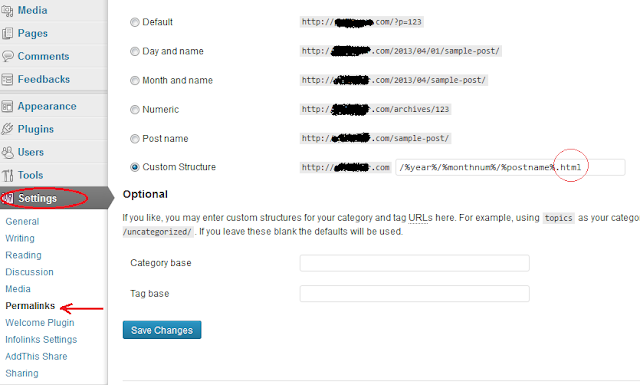
2- Select "Permalinks" under the Settings area and then choose "Custom Structure"
3- Add the extension .html in the end of the default custom structure link as mentioned in the snapshot.
4- Click on "Save Changes"
Now its time to import your blog here. All posts will be automatically published with the same links as on blogger.
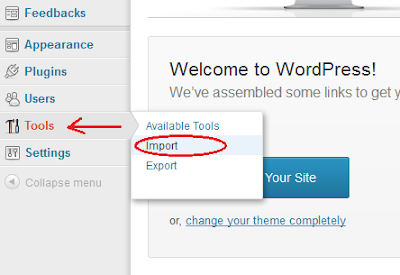
Go to Tools and select Import option
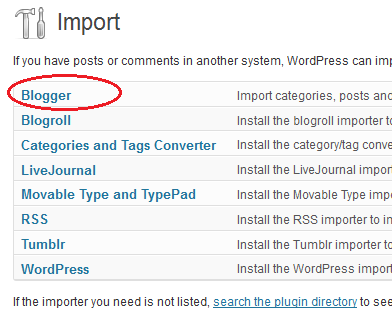
Now click on the Blogger which is at position 1st
Install the blogger importer plugin which will appear after clicking on Blogger
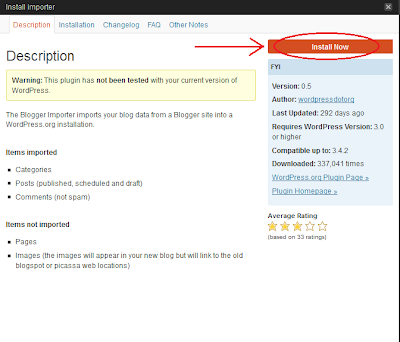
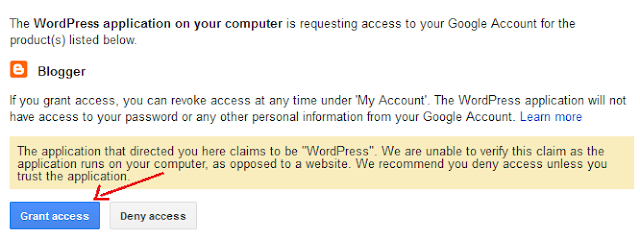
After installing successfully, click on the authorize button you will be directed to blogger

Now you will see your blog title, url, and number of posts and comments on wordpress page, click on "Import" Button
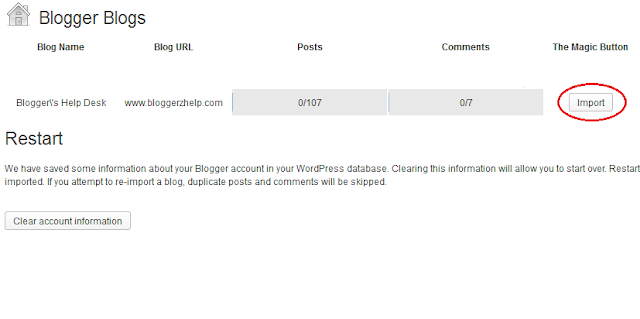
Your complete blog now has shifted to self hosted wordpress blog with old posts' links and comments.
Must Remember
1- Do not forget to submit your new site map to the webmaster tools and also update your own new feed url (example.com/feed/) into your feedburner account.
2- Go to your domain control panel and change your CNAME (Alias) setting and point www to @
2- Go to your domain control panel and change your CNAME (Alias) setting and point www to @
Friday, 29 March 2013
How to Change Default Post Time for Your Blog

There are many bloggers from all over the word. Some are professional blogger while some are amateur. These all bloggers are from different countries. Whenever a blogger publishes his post, the default time of publishing is assigned to the post according to the time zone of the blog. Blogger has set default time zone for all regions which is Pacific Time. To better management of your blog, you should change the time zone according to your location.
Changing the time zone is very simple and easy. When you will change the time zone of your blog, this will automatically apply to all your posts and the publish time of your all posts will set according to your current time zone.
To change your blog time zone, follow the steps:
1- Go to Blogger Dashboard
2- Select Settings > Language and formatting
3- Under the "Formatting" are, select your time zone accordingly
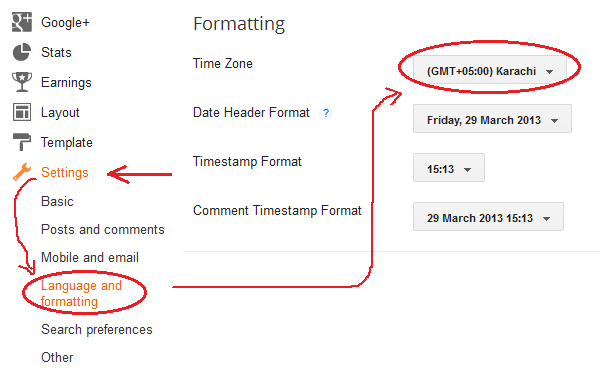
4- Now save your settings, your all posts' time will be set as your current time zone.
How to Add Email Subscription Box in Blogger

This tip can help you to increase your number of regular users and also increase the number of page views. When you put useful things and information in your blog then many people want to join your site to get the daily update news and information from your blog. For this purpose you have to add the email subscription form or box into your blog so that they can easily get the updates of your blog.
Here is the procedure that how can you add this box into your own blog. For this purpose, follow these steps:
- First of all go to your blogger 'Dashboard'.
- Then go to 'Layout' and click on 'Add a Gadegt' option.
- You'll have a pop-up window, from this window find and click on 'HTML/JavaScript' option.
- Then you'll have an empty box. Don't write anything in 'title' option just under the title option write the following code:
<style>
.hl-email{
background:url(https://blogger.googleusercontent.com/img/b/R29vZ2xl/AVvXsEi4KVTA4Wh9M_sLfLJYynbjIFf6k1nbputAp8c09yGkx63L58uyEXLsaRRdFdFaYZALMik4A1wjGMz6ukI8IsQW2sXFuwouXcjq70gDsnSdGyzil2GX8TDAGK1JtLRryxrJ2S-GOv9EemM/s1600/mail.png) no-repeat 0px 12px ;
width:300px;
padding:10px 0 0 55px;
float:left;
font-size:1.4em;
font-weight:bold;
margin:0 0 10px 0;
color:#686B6C;
}
.hl-emailsubmit{
background:#9B9895;
cursor:pointer;
color:#fff;
border:none;
padding:3px;
text-shadow:0 -1px 1px rgba(0,0,0,0.25);
-moz-border-radius:6px;
-webkit-border-radius:6px;
border-radius:6px;
font:12px sans-serif;
}
.hl-emailsubmit:hover{
background:#E98313;
}
.textarea{
padding:2px;
margin:6px 2px 6px 2px;
background:#f9f9f9;
border:1px solid #ccc;
resize:none;
box-shadow:inset 1px 1px 1px rgba(0,0,0,0.1);
-moz-box-shadow:inset 1px 1px 1px rgba(0,0,0,0.1);
-webkit-box-shadow:inset 1px 1px 1px rgba(0,0,0,0.1); font-size:13px;
width:150px;
color:#666;}
</style>
<div class="hl-email">
Subscribe via Email <form action="http://feedburner.google.com/fb/a/mailverify" id="feedform" method="post" target="popupwindow" onsubmit="window.open('http://feedburner.google.com/fb/a/mailverify?uri=bloggerzhelp', 'popupwindow', 'scrollbars=yes,width=550,height=520');return true">
<input gtbfieldid="3" class="textarea" name="email" onblur="if (this.value == "") {this.value = "Enter email address here";}" onfocus="if (this.value == "Enter email address here") {this.value = "";}" value="Enter email address here" type="text" />
<input type="hidden" value="bhd" name="uri"/><input type="hidden" name="loc" value="en_US"/>
<input class="hl-emailsubmit" value="Submit" type="submit" />
</form>
</div>
Customization:
- Replace the URL for your desired email icon in Pink colour portion.
- Adjust the value of text area according to your own in 150 place.
- Set your own Feedburner email feed link in place of Red portion.
- Replace 'bhd' with your feed title. You ca get it at the end of your feed link.
Now you are done, save your widget and set it on your page layout and then click on 'Save arrangements'. Check your blog and enjoy with this feature.
Subscribe to:
Comments
(
Atom
)


